Building a SQL Server Virtual Lab in Windows: Creating the Domain Controller (DC) VM
Author: JP Chen | | July 1, 2020
A Windows Domain allows administrators to manage computers on the same network. At least one Windows Server called a Domain Controller (DC) with the Active Directory Domain Services (AD DS) server role installed responds to authentication requests across the domain and uses Group Policy to manage all domain users and computer settings remotely.
In this post, I’ll create the DC VM, configure the DC VM, install Windows Server 2019, install Oracle VM VirtualBox Guest Additions, rename the VM, promote the VM as a Domain Controller (DC), assign static IP address for the VM, create domain accounts for the SQL Server services, and create a domain account for the SQL DBA.
If you missed the post on Installing Oracle VM VirtualBox and Creating a Virtual Network you can find it here. Let’s get started!
Creating the DV-DC VM
The DV-DC VM is the first VM we will create and configure as it’s required to authenticate all other VMs joining the domain.
To create the VM for the DV-DC:
- Open Oracle VM VirtualBox Manager if you had closed it.
- Click the Machine menu.
- Click New on the drop-down menu.
- Type DV-DC in the Name text box of the Create Virtual Machine dialog box.
- Leave the default location in the Machine Folder drop-down box.
- Leave the default type as Microsoft Windows in the Type drop-down list box.
- Click on Version the drop-down box.
- Scroll down and select Windows 2019 (64-bit).
- Click Next.
- Type 1024 in the Memory size MB box.
- Click Next.
- Leave the default option button for Create a virtual hard disk now selected.
- Click Create.
- Leave the default option button for VDI (VirtualBox Disk Image)
- Click the Next.
- Leave the default option button for Dynamically allocated option selected.
- Click Next.
- Leave the file location as the default specified in the file location folder text box.
- Type 32 in the box for you specify the hard disk space. In the virtual lab, we are creating a 32 GB hard disk for the DV-DC VM.
- Click Create.
Oracle VM VirtualBox Manager will create the VM as per the options you had specified as in Figure 2-13 DV-DC VM Settings.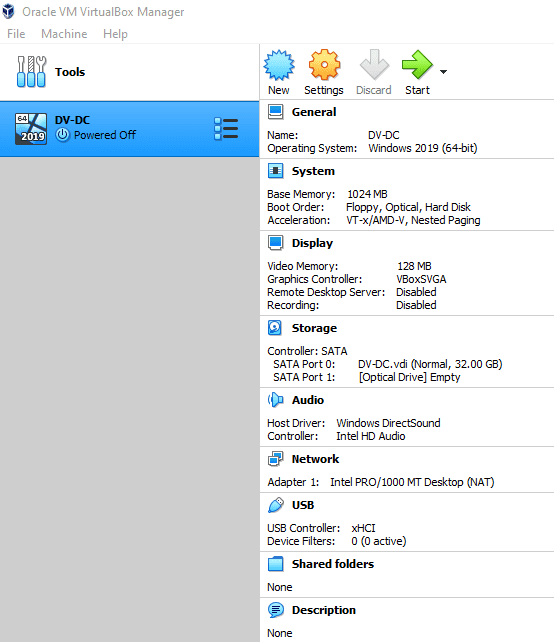
Figure 2-13 DV-DC VM Settings
Configuring the DC VM
Oracle VM VirtualBox is a feature-rich software. For the virtual lab, we will focus on configuring the Shared Clipboard, Drag’n’Drop, mounting the Windows Server 2019 ISO file, attaching the VM to the NAT Network, and adding a shared folder.
The Shared Clipboard feature after configuring to have the Bidirectional option and installing Oracle VM VirtualBox Guest Additions will enable copy and paste between the host computer and the VM.
The Drag’n’Drop feature after configuring to have the Bidirectional option and installing Oracle VM VirtualBox Guest Additions will enable drag and drop between the host computer and the VM.
The NAT Network once attached will connect the VM to the virtual network specified.
An ISO file is an archive file that contains an image found on an optical disc like CD or DVD. We will mount the Windows Server 2019 ISO file to install it on the VM.
The Shared Folder after creating it and installing Oracle VM VirtualBox Guest Additions will enable file sharing between the host computer and the VM.
To enable bidirectional for both Shared Clipboard and Drag’n’Drop:
- Right-click on the DV-DC VM on the left pane of the Oracle VM VirtualBox Manager.
- Click Settings… on the pop-up menu.
- Click the Advanced tab on the General page.
- Click on the drop-down box for Shared Clipboard.
- Click Bidirectional to select it.
- Click on the drop-down box for Drag’n’Drop.
- Click Bidirectional to select it.
To mount the Windows Server 2019 Evaluation Edition iso file:
- Click Storage on the left pane.
- Click the Empty disk icon on the Storage Devices section.
- Click the disk drop-down icon next to the Optical Drive drop-down box as shown in Figure 2-14 Mounting an ISO File.
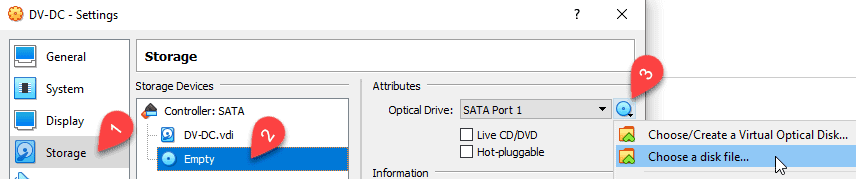
Figure 2-14 Mounting an ISO File
- Click Choose a disk file… from the list.
- Browse to the folder where you had put all the software for the virtual lab. In our example, it is D:\Virtual Lab Software.
- Click the Windows Server 2019 Evaluation Edition.iso file.
- Click Open to mount the iso.
To attach to the NAT Network:
- Click Network on the left pane.
- Click the Attached to drop-down box.
- Click NAT Network on the list.
Notice that the NAT Network, DV-SQLNET, appears automatically in the Name drop-down box.
To specify the shared folder:
- Click Shared Folders on the left pane.
- Click the Add icon on the Shared Folders section as shown in Figure 2-15 Specifying the Shared Folder.
- Click the drop-down box for Folder Path.
- Click Other… on the drop-down list.
- Browse to a location where you wish to create a folder to share between the Host computer and the DV-DC guest VM. In our example, we browse to the D:\ drive.
- Create a folder VirtualBox-Share.
- Click Select Folder to select the VirtualBox-Share folder.
- Click the Auto-mount check box to select it.
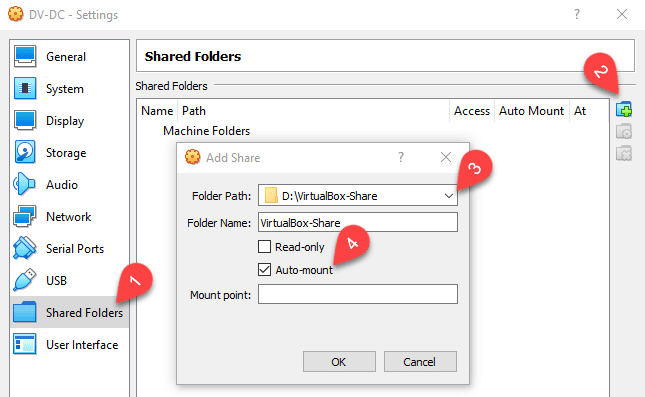
Figure 2-15 Specifying the Shared Folder
- Click OK.
- Click OK on the DV-DC Settings dialog box to close it.
Now the DV-DC VM has Shared Clipboard and Drag’n’Drop features enabled to have Bidirectional, Windows Server 2019 ISO file mounted, NAT Network attached, and a share folder created, we are ready install Windows Server 2019 next.
Installing Windows Server 2019
Four Operating system options are available during the setup. Windows Server 2019 Standard Evaluation, Windows Server 2019 Standard Evaluation (Desktop Experience), Windows Server 2019 Datacenter evaluation, and Windows Server 2019 Datacenter Evaluation (Desktop Experience). For the virtual lab, we will choose the Windows Server 2019 Datacenter Evaluation (Desktop Experience) option and accept all the default options.
Prior to the install, make a note of the password you wish to use for the Administrator account. In the virtual lab, we will keep it simple and use the password Password$ for all users.
Note: For the virtual lab, we are keeping it simple and use the password Password$. Make sure you follow your company’s password policies when configuring the servers for your production or non-production environments.
To install Windows Server 2019 on the DV-DC VM:
- Click the DV-DC VM on the left pane to select it.
- Click the green start arrow to get started with the installation.
- Click the drop-down box to select Windows Server 2019 Evaluation Edition.iso (4.93 GB) on Select start-up disk dialog box.
- Accept the default settings in the drop-down boxes for Language to install, Time and currency format, and Keyboard or input method on the Windows Setup dialog box.
- Click Next to continue.
- Click Install now.
- Click Windows Server 2019 Datacenter Evaluation (Desktop Experience).
- Click Next.
- Click the I accept the license terms check box to select it.
- Click Next.
- Click the Custom: Install Windows only (advanced) option.
- Click Next on the Windows Setup dialog box to specify Where do you want to install Windows?
Windows Setup will run through the steps of Copying Windows files, getting files ready for installation, Installing features, Installing updates, and Finishing up. During the setup, Oracle VM VirtualBox will reboot the VM.
- Type Password$ as the password for the Administrator in the Password text box in the Customize settings page.
- Press Tab on the keyboard.
- Type Password$.
- Click Finish.
- Click the Input menu.
- Click Keyboard on the drop-down list.
- Click Insert Ctrl-Alt-Del Host+Del on the drop-down sub-menu as shown in Figure 2-16 Unlocking Windows.
Tip: You can also press Ctrl+Delete to unlock the VM.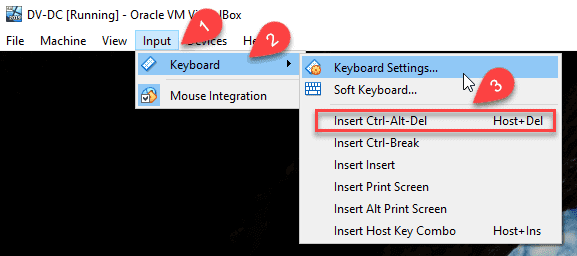
Figure 2-16 Unlocking Windows
- Type in Password$ in the Password text box for the Administrator.
- Press Enter on the keyboard.
- Click Yes on the Network confirmation dialog box to confirm you want your PC to be discoverable by other PCs and devices on this network.
You are then logged on to Windows Server 2019 and the Server Manager Dashboard loads and shows up. You have successfully installed Windows Server 2019. Next, we will install Oracle VM VirtualBox Guest Additions.
Installing Oracle VM VirtualBox Guest Additions
Oracle VM VirtualBox Guest Additions enables bidirectional for Shared Clipboard and Drag’n’Drop and file sharing between the host computer and the VM using the shared folder of which we had all configured back on Configuring the DC VM. Through the better video support feature, it will auto-adjust to resize the VM window to use the full size of the screen.
To install Oracle VM VirtualBox Guest Additions:
- Click the Device menu on Oracle VM VirtualBox.
- Click Insert Guest Additions CD image… on the drop-down menu as shown on Figure 2-17 Insert Guest Additions CD Image to mount the Oracle VM VirtualBox Guest Additions CD image to the CD-ROM drive of the VM.
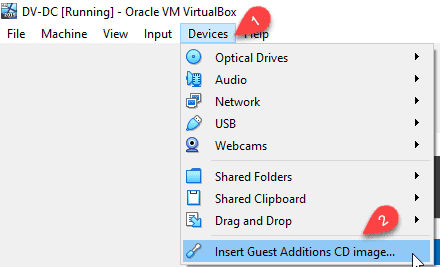
Figure 2-17 Insert Guest Additions CD Image
- Press Win+E on your keyboard.
- Click This PC on the left pane.
You will see the CD Drive (D:) contains the VirtualBox Guest Additions. - Double-click CD Drive (D:) VirtualBox Guest Additions to open it.
- Double-click VBoxWindowsAdditions to run it.
- Click Next on the Oracle VM VirtualBox Guest Additions 6.1.4 Setup dialog box to continue.
- Click Next to accept the default installation folder location.
- Click Install to accept the default components options to start the installation.
- Click Install on the prompt asking: “Would you like to install this device software?”
- Click Finish to accept the option to reboot now to complete the installation.
- Logon to the DV-DC VM after the reboot.
- Maximize the DV-DC VM window.
You will then notice the screen is stretched to use the full screen.
Renaming the VM
During the installation of Windows Server 2019, Oracle VM VirtualBox assigns an auto-generated server name to the VM. For the virtual lab, we will rename the DC VM to DV-DC.
To rename the VM to DV-DC:
- Open Server Manager.
- Click Local Server on the left pane of the Server Manager Dashboard as shown in Figure 2-18 Changing the Computer Name to DV-DC.
- Click the existing link for Computer name. In this example, it’s showing WIN-G45N3G5IRLE.
- Click Change…
- Type DV-DC in the Computer name text box.
- Click OK.
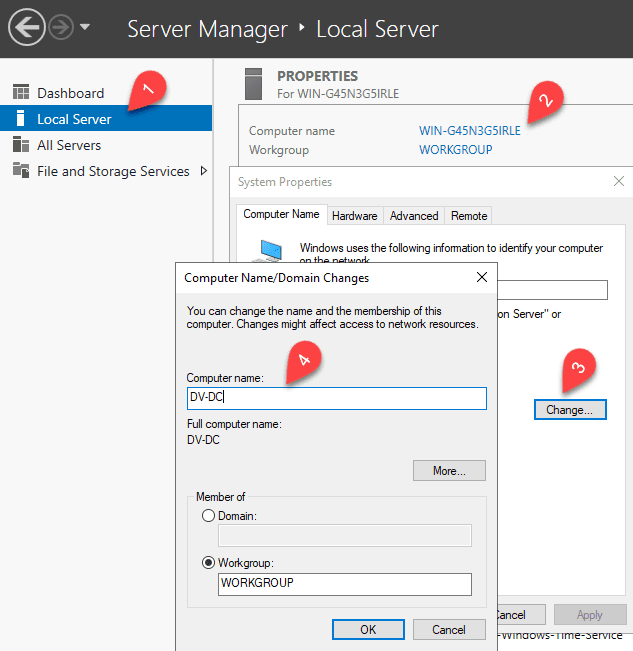
Figure 2-18 Changing the Computer Name to DV-DC
- Click OK to accept “You must restart your computer to apply these changes.”
- Click Close.
- Click Restart Now to restart.
The VM reboots and ready for you to logon to continue to the next steps where we will promote the server to a domain controller.
Promoting the DV-DC VM to Domain Controller (DC)
Previously, we had mentioned a domain controller is the server with the Active Directory Domain Services (AD DS) server role installed. In this section, we will install AD DS on the DV-DC VM, create the DV-SQLNET.COM domain, and then promote it to a domain controller.
To install the AD DS role to the DV-DC:
- Open Server Manager.
- Click the Manage menu on the upper right-hand corner.
- Click Add Roles and Features on the drop-down list.
- Click Next on the Add Roles and Features Wizard.
- Leave the Role-based or feature-based installation option button selected for the installation type.
- Click Next.
- Leave the Select a server from the server pool option button selected.
By default, the server you had created, DV-DC, is selected. - Click Next >.
- Click the Active Directory Domain Services check box.
- Click Add Features on the Add Roles and Features Wizard pop-up.
- Click Next >.
- Click the .NET Framework 3.5 Features check box to select it as one of the features to add.
- Click Next >.
- Click Next > on the AD DS step to continue.
- Click Install on the Confirmation step to continue.
The installation will run to install the Active Directory Domain Services role and .NET Framework 3.5 features and associated files as show in Figure 2-19 Adding Roles and Features Installation in Progress.
Figure 2-19 Adding Roles and Features Installation in Progress
The installation will run to install the features and tools you had selected. The progress status will show you the estimated percentage completed. You will need to wait for the option to Promote this server to a domain controller to come up before continuing.
To promote the DV-DC VM to a Domain Controller (DC):
- Click on the Promote this server to a domain controller link as shown in Figure 2-20 Promote DV-DC to a Domain Controller to start the process to promote it to a domain controller.
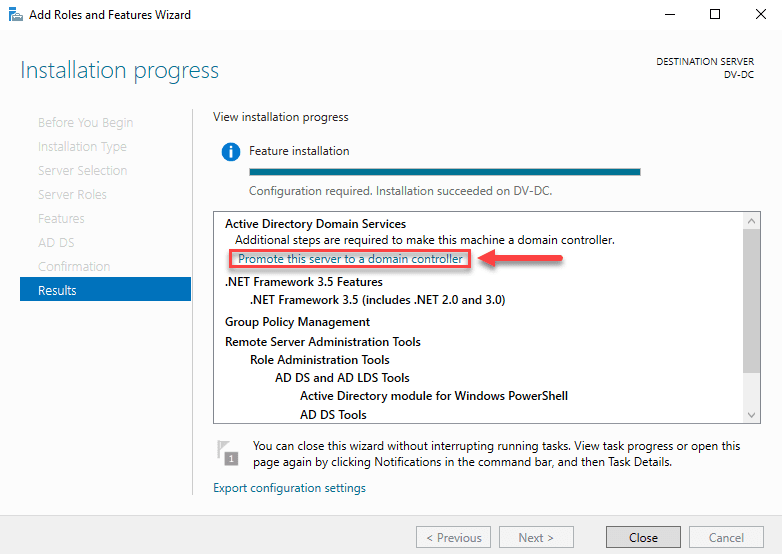
Figure 2-20 Promote DV-DC to a Domain Controller
- Click the Add a new forest option button as this is the option allows us to create a new domain.
- Type DV-SQLNET.COM in the Root domain name text box.
- Click Next > to continue.
- Type Password$ in the Password text box for Directory Services Restore Mode (DSRM) password.
- Press Tab on your keyboard.
- Type Password$ in the Confirm password text box.
- Click Next >.
- Click Next > on the DNS Options step.
- Leave the default name DV-SQLNET in the NetBIOS domain main text box.
- Click Next > to continue.
- Leave the default paths for the Database folder, Log file folder, and SYSVOL folder in the Paths step.
- Click Next > to continue.
- Review your selections in the Review Options step.
- Click Next >.
- Review results in the Prerequisites Check step.
- Scrolling down on the View results text area.
- Find the last line of the check as it needs to show “All prerequisite checks passed successfully. Click ‘Install’ to begin installation.”
- Click Install to start the installation.
The installation runs and then completes. It will reboot the DV-DC VM and apply the required computer settings.
- Press Ctrl+Delete on your keyboard to unlock the logon screen.
Notice that Windows Server 2019 now greets you with the domain login prompt
- Type Password$ as the password.
- Press Enter on your keyboard.
- Click Local Server on the left pane of Server Manager.
Notice the Computer name has been updated to DV-DC and Domain listed as DV-SQLNET.COM as shown in Figure 2-21 Computer Name and Domain.
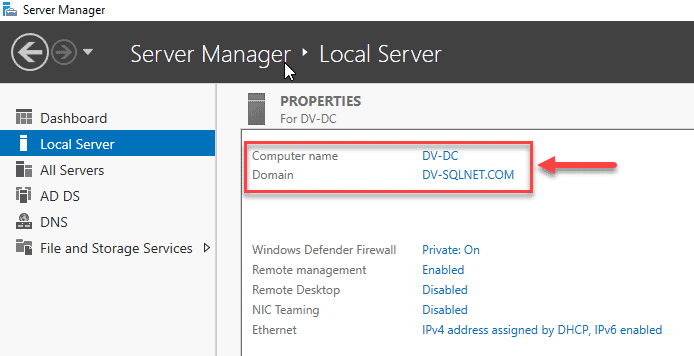
Figure 2-21 Computer Name and Domain
You have now completed the steps adding the AD DS server role, promoting the server as a domain controller, and you have also created a domain – DV-SQLNET.COM. In the next steps, we will assign a static IP Address to the DV-DC VM.
Assigning Static IP Address to the DV-DC VM
A static IP address is fixed and does not change, while a dynamic IP address does. Static IP addresses are assigned to the servers manually and will not change until modified. They are necessary for servers that need constant access and let you reach the specific servers without the IP addresses change and block you accessing them. Furthermore, they help avoid potential IP address conflicts that may happen for dynamic IP addresses.
Back in IP Properties of the Virtual Lab, we had listed the IP addresses along with the Subnet Mask, Default Gateway, Preferred DNS Server, and Alternate DNS Server for the DV-DC, DV-SQL01, DV-SQL02, and DV-SQL03 VMs. In this section, we will assign the static IP address to the DV-DC VM.
To assign a static IP address to the DV-DC VM:
- Open Server Manager.
- Click Local Server on the left pane.
- Click the link for Ethernet as shown in Figure 2-22 Ethernet Properties.
- Right-click Ethernet in the Network Connections folder.
- Click Internet Protocol Version 4 (TCP/IPv4).
- Click Properties.
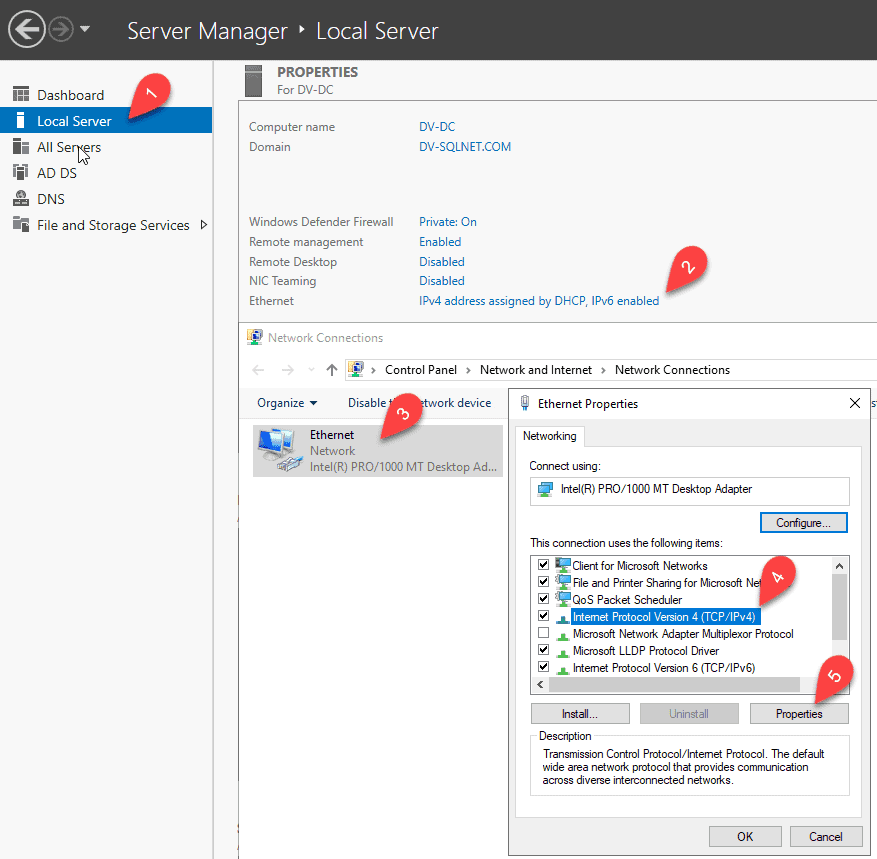
Figure 2-22 Ethernet Properties
- Click the Use the following IP address option button to assign a static IP as shown in Figure 2-23 Assigning Static IP to the DV-DC VM.
- Type 192.168.0.20 for the IP address field.
- Press Tab on your keyboard.
Notice that the Subnet mask of 255.255.255.0 is filled in automatically for you. - Type 192.168.0.1 in the Default gateway field.
- Leave the default IP address 127.0.0.1 as the Preferred DNS server.
- Type 8.8.8.8 in the Alternate DNS server field.
We will use Google’s DNS server as the backup.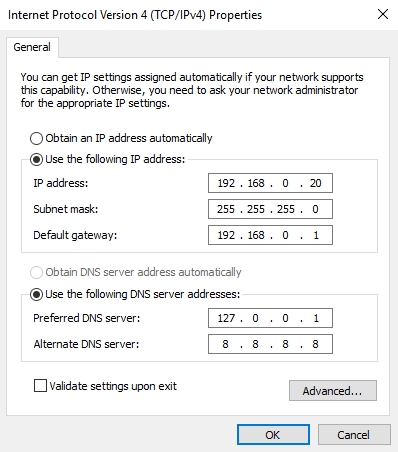
Figure 2-23 Assigning Static IP to the DV-DC VM
- Click OK.
- Click Close on the Ethernet Properties dialog box to close it.
You have now assigned the static IP address to the DV-DV VM. Next, we will go through the steps of creating domain user accounts for the SQL Server and SQL Server services for each of the SQL Server instances.
Creating Domain Accounts for the SQL Server Services
As a security best practice, Microsoft recommends creating individual accounts for all services and follow the Principle of Least Privilege (POLP). In other words, create accounts for each of the required services and grant the bare minimum permissions for the accounts to perform their work. Not more.
In this section, we will create SQL Server service and SQL Server Agent service accounts for each of the three SQL Server instances, set password to not expire, create a security group, and then add all the service accounts to the security group.
In our virtual lab, we will only install the SQL Server Database Engine plus the minimum features. We will create the SQL Server service and the SQL Server Agent service accounts for each SQL Server instances as shown in Table 2-3 SQL Service Accounts for the Virtual Lab. Each of the service account will start with the prefix of svc as the abbreviation for service, underscore (_), server name, underscore (_), and then the function of the account. For example, svc_dv-sql01_sqlde for Database Engine (de) and svc_dv-sql01_sqlagent for the SQL Server Agent (sqlagent) service accounts of DV-SQL01.
Table 2-3 SQL Service Accounts for the Virtual Lab
| SQL Server | SQL Server Service Account | SQL Server Agent Service Account |
| DV-SQL01 | svc_dv-sql01_sqlde | svc_dv-sql01_sqlagent |
| DV-SQL02 | svc_dv-sql02_sqlde | svc_dv-sql02_sqlagent |
| DV-SQL03 | svc_dv-sql03_sqlde | svc_dv-sql03_sqlagent |
To create the domain users accounts for the SQL Server services:
- Logon to the DV-DC VM.
- Open Server Manager.
- Click the Tools menu on the upper right-hand corner.
- Click Active Directory Users and Computers on the dropdown menu.
- Right-click the Users folder under the DV-SQLNET.COM domain as shown in Figure 2-24 Creating a User.
- Click New on the pop-up menu.
- Click User on the pop-up menu.
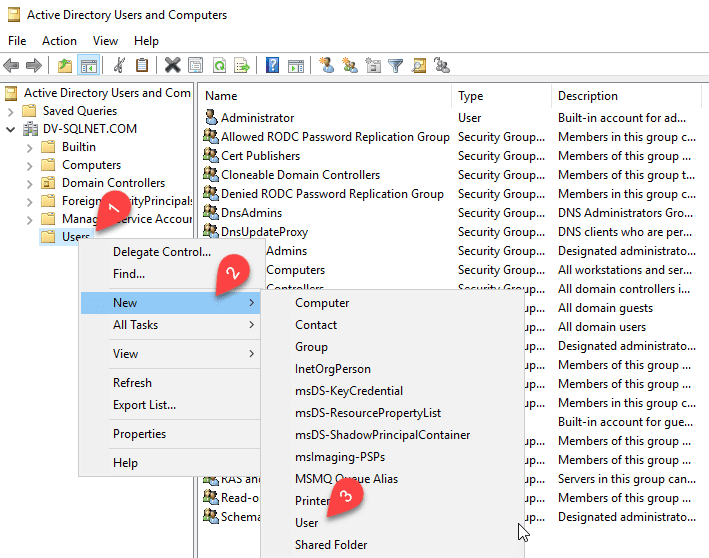
Figure 2-24 Creating a User
- Type svc_dv-sql01_sqlde in the User logon name text box.
- Copy svc_dv-sql01_sqlde in the User logon name text box.
- Paste it in the First name text box.
Notice that the Full name text box is auto filled with what’s on the First name text box. - Click Next >.
- Type Password$ in the Password text box.
- Press Tab on your keyboard.
- Type Password$ in the Confirm password text box.
- Click the User change password at next logon check box to uncheck it.
We don’t need to have the user change password at next logon as this is a service account and we won’t logon to a server with a service account. - Click the Password never expires check box to check it.
We don’t need the password to expire as it will disable the service account if expired. - Click Next >.
- Click Finish.
- Repeat steps 5 to 18 to create all the remaining service accounts in Table 2-3 SQL Service Accounts for the Virtual Lab. Once completed, all the users accounts created will show up in the Users folder as shown in Figure 2-25 SQL Server and Agent Service Accounts.
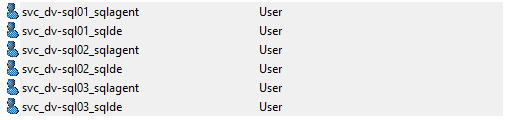
Figure 2-25 SQL Server and Agent Service Accounts
To group the domain users for the service accounts, we will create a domain user group, SQLServiceAccounts, then add the service accounts to the group.
To create the SQLServiceAccounts group:
- Right the Users folder under the DV-SQLNET.COM domain.
- Click New on the pop-up menu.
- Click Group on the pop-up menu.
- Type SQLServiceAccounts in the Group name text box.
- Click OK.
To add all the SQL Server and Agent Service Accounts to the SQLServiceAccounts group:
- Double-click the SQLServiceAccounts group you had created.
- Click the Members tab.
- Click Add.
- Type in all the service accounts you had created as shown in the Table 2?3 SQL Service Accounts for the Virtual Lab and separate them by semicolon (;).
- Click Check Names.
As shown in Figure 2-27 Adding the Users to the SQLServiceAccounts Group, all the service accounts are verified and underlined.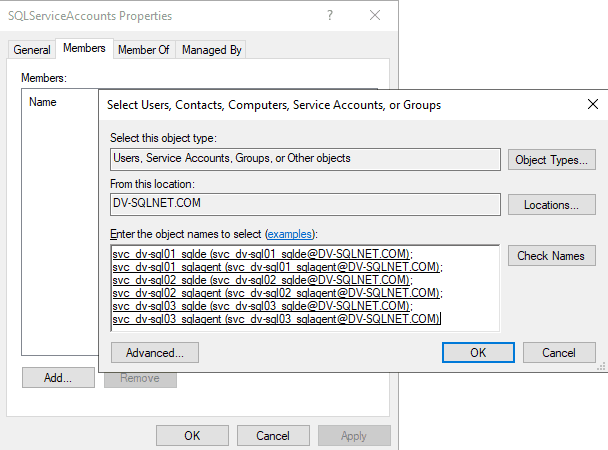
Figure 2-27 Adding the Users to the SQLServiceAccounts Group
- Click OK.
- Click OK to close the SQLServiceAccounts Properties dialog box.
You have now created the domain user accounts for the SQL Server services and added them to the SQLServiceAccounts group. Next, we will create a domain account for the SQL DBA, Jack Bauer.
Creating a Domain Account for the SQL DBA
For the SQL DBA account, a Windows Domain user account is all that is needed. Not a domain administrator account or any account with elevated privileges.
To create a Windows Domain user account for the SQL DBA:
- Right-click the Users folder under the DV-SQLNET.COM domain.
- Click New on the pop-up menu.
- Click User on the pop-up menu.
- Type Jack in the First name text box.
- Type Bauer in the Last name text box.
- Type JBauer in the User logon name text box.
- Click Next >.
- Type Password$ in the Password text box.
- Press Tab on your keyboard.
- Type Password$ in the Confirm password text box.
- Click the check box to uncheck it for User must change password at next logon.
- Click Next > to continue.
- Click Finish.
This creates the Windows Domain account for the SQL DBA, Jack Bauer. User name: JBauer.
And now you’ve created the Domain Controller VM! Great job. Don’t miss blog post #6 next week: Create VMs for the SQL Servers. If you’ve missed anything in the series, I’ve included the links below.
Virtual Network for the Virtual Lab
Software & Hardware Requirements
Installing Oracle VM VirtualBox and Creating a Virtual Network

Blog Author
Related Posts

How to Solve the Oracle Error ORA-12154: TNS:could not resolve the connect identifier specified
The “ORA-12154: TNS Oracle error message is very common for database administrators. Learn how to diagnose & resolve this common issue here today.

Data Types: The Importance of Choosing the Correct Data Type
Most DBAs have struggled with the pros and cons of choosing one data type over another. This blog post discusses different situations.

How to Recover a Table from an Oracle 12c RMAN Backup
Our database experts explain how to recover and restore a table from an Oracle 12c RMAN Backup with this step-by-step blog. Read more.