Building a SQL Server Virtual Lab in Windows: Installing Oracle VirtualBox
Author: JP Chen | | June 25, 2020
Back in my second post in the series, Virtual Network for the Virtual Lab, I had described the concept of a NAT Network and reviewed the diagram of the virtual lab. Then in Software Requirements, I had mentioned Oracle VM VirtualBox is the hypervisor software that you’ll need to install on the host computer to create and run the virtual network and VMs. In this section, I’ll go through the steps on installing Oracle VM VirtualBox, specifying the default location for the VMs, and creating the virtual network – DV-SQLNET.
Installing Oracle VM VirtualBox
Before we can create our virtual network and run the virtual lab, we need to install Oracle VM VirtualBox.
To install Oracle VM VirtualBox:
- Go to the Virtual Lab Software In our example, it is D:\Virtual Lab Software.
- Double-click on the VirtualBox-6.1.4-136177-Win.exe
- Click Next.
- Click Next on the Custom Setup dialog box to accept the default options to continue.
- Click Next to leave the default options selected to continue.
- Click Yes to accept the warning that the networking feature will reset your network connection and temporarily disconnect you from the network.
Caution: Read the warning carefully! If you are in the middle of an important task and need to remain connected to your network or internet, consider installing Oracle VM VirtualBox in a later time. - Click Install on the Ready to Install dialog box to install VirtualBox.
- Click Yes on the User Account Control warning dialog box as it will ask “Do you want to allow this app to make changes to your device?”
- Click Finish and leave the check box Start Oracle VM VirtualBox 6.1.4 after installation checked on the setup dialog box.
A) Oracle VM VirtualBox will prompt you to download and upgrade to the newest version if one existed.
B) After installing it successfully, the Oracle VM VirtualBox Manager will open as shown in Figure 2-10 Oracle VM VirtualBox Manager.
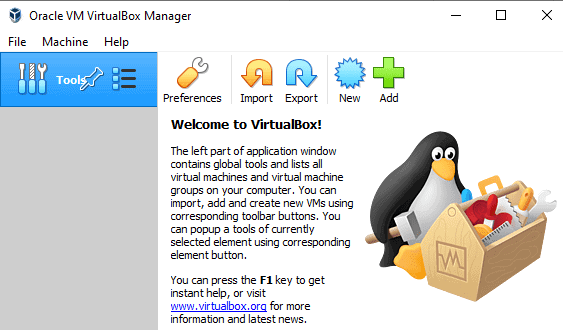
Figure 2-10 Oracle VM VirtualBox Manager
Specifying the default location for the VMs
In the virtual lab, we will create VMs for HADR testing. To organize the VMs, we will create a designated folder and specify it as the default location for all the VMs.
To specify the default location to store all the VMs:
- Click the File menu on Oracle VM VirtualBox Manager.
- Click Preferences… from the drop-down menu.
- Click the down arrow on the drop-down box for Default Machine Folder on the General tab of the VirtualBox – Preferences dialog box.
- Select Other… on the drop-down list.
- Browse to where you wish to store your VMs.
- Create a folder to store the VMs for the virtual lab. As shown in Figure 2-11 Default Machine Folder, a folder DV-SQLNet Virtual Lab is created to store the VMs.
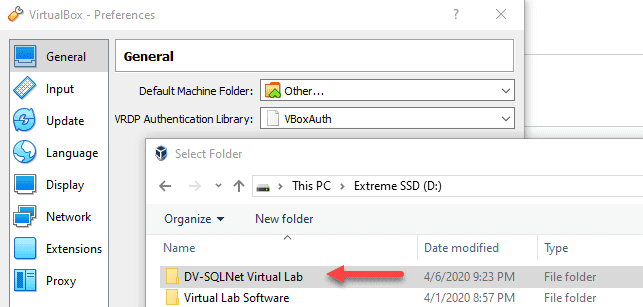
Figure 2-11 Default Machine Folder
- Click the DV-SQLNet Virtual Lab folder to select it.
- Click Select Folder.
- Click OK.
All the VMs will get created in the folder you had just specified as the default machine folder.
Creating the Virtual Network – DV-SQLNET
After installing the hypervisor software – Oracle VM VirtualBox, we can now create a virtual network for our virtual lab.
To create the virtual network – DV-SQLNET:
- Click the File menu on Oracle VM VirtualBox Manager.
- Click Preferences…
- Click Network on the left pane of VirtualBox – Preferences.
- Click the Add icon to add a new NAT network as shown in Figure 2-12 Creating the DV-SQLNET Network.
- Double-click the newly created Nat network NatNetwork.
- Type DV-SQLNET in the Network Name text box.
- Type 168.0.0/24 in the Network CIDR text box.
- Leave the Supports DHCP check box selected.
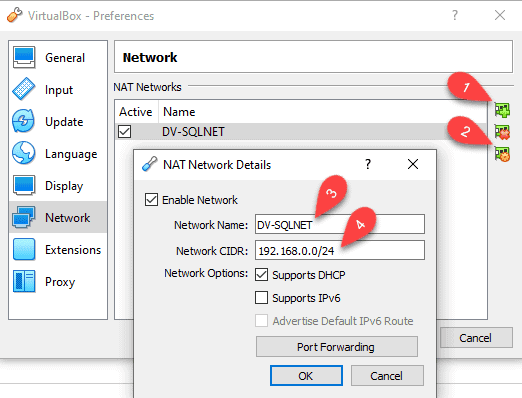
Figure 2-12 Creating the DV-SQLNET Network
Dynamic Host Configuration Protocol (DHCP) is a network management protocol where a DHCP server can dynamically assign IP addresses to devices on the network for communications. You can do further reading on this link: https://docs.microsoft.com/en-us/windows-server/networking/technologies/dhcp/dhcp-top.
- Click OK.
The DV-SQLNET network is then created.
And that’s it! Did it work for you? Next week I take on: Creating the Domain Controller (DC) VM. If you’ve missed any of the blogs in the series, you can find them here:

Blog Author
Related Posts

How to Solve the Oracle Error ORA-12154: TNS:could not resolve the connect identifier specified
The “ORA-12154: TNS Oracle error message is very common for database administrators. Learn how to diagnose & resolve this common issue here today.

Data Types: The Importance of Choosing the Correct Data Type
Most DBAs have struggled with the pros and cons of choosing one data type over another. This blog post discusses different situations.

How to Recover a Table from an Oracle 12c RMAN Backup
Our database experts explain how to recover and restore a table from an Oracle 12c RMAN Backup with this step-by-step blog. Read more.