Building a SQL Server Virtual Lab in Windows: Create VMs for the SQL Servers
Author: JP Chen | 19 min read | July 10, 2020
What if you can save efforts and reduce errors in creating multiple copies of a VM, wouldn’t it be nice? With cloning, you can! That’s exactly what we will do in this section. We will go through the following steps:
- Creating a VM
- Configuring the VM
- Installing Windows Server 2019
- Installing Oracle VM VirtualBox Guest Additions
- Downloading the SQL Server Management Studio (SSMS)
- Installing SQL Server 2019 and SSMS
- Deploying Ola Hallengren’s SQL Server Maintenance Solution
- Enabling TCP/IP for SQL Server
- Configuring Windows Firewall
- Cloning the VM to create two extra VMs
We will complete steps 1 to 9 and then clone the VM to create two extra VMs in step 10 rather than repeating the same steps over again to create multiple VMs. Cookie-cutter approach applied positively!
Creating a VM
We will start with creating a VM and this VM will serve as the template to clone two extra VMs. We will run through the steps quickly as they are the same as we had done back in blog #5: Creating the DV-DC VM. The only difference is on the disk space step where we will allocate 40 GB for the VM instead of 32 GB as we did for the DC as we will installing Windows Server 2019 and SQL Server 2019 on this VM.
To create the template VM in Oracle VM VirtualBox:
- Open Oracle VM VirtualBox Manager.
- Click the Machine menu.
- Click New on the dropdown menu.
- Type VM in the Name text box.
- Leave the default location in the Machine Folder text box.
- Click on Version the drop-down list box.
- Scroll down to select Windows 2019 (64-bit) on the drop-down list box.
- Click Next.
- Type 1024 in the Memory size MB combo box.
- Click Next.
- Leave the default option of Create a virtual hard disk now selected.
- Click Create.
- Leave the default option of VDI (VirtualBox Disk Image) selected in the Hard disk file type step.
- Click Next.
- Leave the default option of Dynamically allocated selected in the Storage on physical hard disk step.
- Click Next.
- Leave the file location as the default specified in the file location folder text box.
- Type 40 in the text box for you specify the hard disk space.
We are allocating 40 GB for the VM as we will install Windows Server 2019 and SQL Server 2019. - Click Create.
Oracle VM VirtualBox Manager will then create the VM. The DV-DC VM and the new VM you had just created will show up on the left pane.
Configuring a VM
In this section, like back in Configuring the DV VM, we will go through the steps to enable bidirectional for both Shared Clipboard and Drag’n’Drop, mount the Windows Server 2019 ISO, attach the NAT Network, and specify the Shared Folder. As we had already done these steps previously, we will run through them quickly here.
To enable bidirectional for both Shared Clipboard and Drag’n’Drop:
- Right-click the VM on the left pane of the Oracle VM VirtualBox Manager.
- Click Settings… on the pop-up menu.
- Click the Advanced tab on the General page.
- Click on the drop-down box for Shared Clipboard.
- Click Bidirectional to select it.
- Click on the drop-down box for Drag’n’Drop.
- Click Bidirectional to select it.
To mount the Windows Server 2019 Evaluation Edition iso file:
- Click Storage on the left pane.
- Click the Empty disk icon on the Storage Devices section.
- Click the disk dropdown icon next to the Optical Drive dropdown box.
- Click Choose a disk file… from the list.
- Browse to the folder where you had put all the required software for the virtual lab. In our example, D:\Virtual Lab Software.
- Click the Windows Server 2019 Evaluation Edition.iso file.
- Click Open to mount the iso.
To attach to the NAT Network:
- Click Network on the left pane.
- Click Attached to drop-down box.
- Click NAT Network on the list.
The NAT Network, DV-SQLNET, we had created back in Creating the Virtual Network – DV-SQLNET, appears automatically in the Name drop-down box.
To specify the shared folder:
- Click Shared Folders on the left pane.
- Click the Add icon on the Shared Folders section.
- Click the dropdown box for Folder Path.
- Click Other… on the dropdown list.
- Browse to the folder where you had created back in Configuring the DC VM. In our example, it is D:\VirtualBox-Share.
- Click Select Folder to select the VirtualBox-Share folder.
- Click the Auto-mount check box to select it.
- Click OK.
- Click OK on the VM Settings dialog box to close it.
Installing Windows Server 2019
As we had done back in Installing Windows Server 2019 for the DC VM, we will go through the same steps here. We will again choose the Windows Server 2019 Datacenter Evaluation (Desktop Experience) option and accept all the default options.
In the virtual lab, we will keep it simple and use the password Password$ for all users.
To install Windows Server 2019 on the template VM:
- Open Oracle VM VirtualBox Manager.
- Click the VM on the left pane to select it.
- Click the green start arrow to get started with the installation.
- Click the dropdown box to select Windows Server 2019 Evaluation Edition.iso (4.93 GB) on Select start-up disk dialog box.
- Click Start.
- Accept the default settings in the drop-down boxes for Language to install, Time and currency format, and Keyboard or input method on the Windows Setup dialog box.
If you are outside of the US, you will need to adjust your settings accordingly. - Click Next to continue.
- Click Install now.
- Click Windows Server 2019 Datacenter Evaluation (Desktop Experience).
- Click Next.
- Click the I accept the license terms check box to select it.
- Click Next.
- Click the Custom: Install Windows only (advanced) option.
- Click Next on the Windows Setup dialog box to specify Where do you want to install Windows? as there’s only one drive.
Windows Setup will run through the steps of Copying Windows files, Getting files ready for installation, Installing features, Installing updates, and Finishing up.
During the setup, Oracle VM VirtualBox will reboot the VM. - Type Password$ as the password for the Administrator in the Password text box on the Customize settings page.
- Press Tab on your keyboard to move to the Reenter password text box.
- Type Password$ in the Reenter password text box.
- Click Finish.
- Click the Input menu.
- Click Keyboard on the drop-down list.
- Click Insert Ctrl-Alt-Del Host+Del on the drop-down menu.
- Type in Password$ in the Password text box for the Administrator.
- Press Enter on the keyboard.
- Click Yes on the Network confirmation dialog box to confirm you want your PC to be discoverable by other PCs and devices on this network.
You are then logged on to Windows Server 2019 and the Server Manager Dashboard loads and shows up.
You have successfully installed Windows Server 2019. Next, we will install Oracle VM VirtualBox Guest Additions.
Installing Oracle VM VirtualBox Guest Additions
The steps are the same as we did back in 2.6.4 Installing Oracle VM VirtualBox Guest Additions for the DC VM. We will go through them quickly here.
To install VirtualBox Guest Additions:
- Click the Device menu on Oracle VM VirtualBox.
- Click Insert Guest Additions CD image… on the drop-down menu.
- Press Win + E key on your keyboard.
- Click This PC on the left pane.
You will see the CD Drive (D:) contains the VirtualBox Guest Additions. - Double-click CD Drive (D:) VirtualBox Guest Additions to open it.
- Double-click VBoxWindowsAdditions to run it.
- Click Next > on the Oracle VM VirtualBox Guest Additions 6.1.4 Setup dialog box to continue.
- Click Next > to accept the default installation folder location.
- Click Install to accept the default components options to start the installation.
- Click Install on the prompt asking: “Would you like to install this device software?”
- Click Finish to accept the option to reboot now to complete the installation.
- Logon to the VM after the reboot.
- Maximize the VM window.
You will then notice the screen is stretched to use the full screen. - Go to the download site for SSMS. https://docs.microsoft.com/en-us/sql/ssms/download-sql-server-management-studio-ssms?view=sql-server-ver15
- Click on the download link Download SQL Server Management Studio (SSMS).
The download for the SSMS-Setup-ENU.exe file will start and save to your default download folder. - Browse to your default download folder.
- Move the SSMS-Setup-ENU.exe file to the VirtualBox-Share folder you had created back on back in 6.2 Configuring the DC VM as shown in Figure 2-26 Moving the SSMS Setup File to VirtualBox-Share.
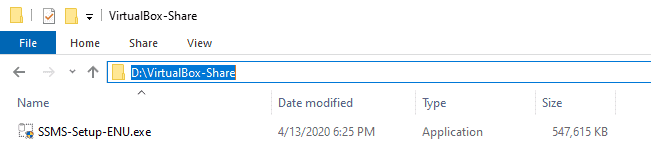
Figure 2-26 Moving the SSMS Setup File to VirtualBox-Share
- Logon to the VM if not already done.
- Click the Device menu.
- Click Optical Drives on the drop-down menu.
- Click Choose a disk file…
- Browse to the folder where you had stored the installation files. In our example, it’s D:\Virtual Lab Software.
- Click the SQLServer2019-x64-ENU-Dev.iso file.
- Click Open.
- Press Win + E on your keyboard.
- Click This PC on the left pane.
- Double-click CD Drive (D:) SQLSetup_x64_ENU.
- Double-click setup.
- Click the Installation link on the SQL Server Installation Center dialog box.
- Click the option on the top of the list New SQL Server stand-alone installation or add features to an existing installation to start the SQL Server installation.
- Leave the default option Developer on the drop-down box for Specify a free edition.
- Click Next >.
- Click the check box for I accept the license term and Privacy Statement to select it.
- Click Next >.
- Leave the check box un-checked for Use Microsoft Update to check for updates (recommended).
We will manage the updates manually. - Click Next >.
- Click Next > on the Install Rules step of the SQL Server 2019 Setup dialog box.
- Maximize the SQL Server 2019 Setup dialog box.
- Click the check boxes for the following Instance Features and Shared Features to select them as shown in Figure 2-27 Selecting the Instance Features and Shared Features to Install:
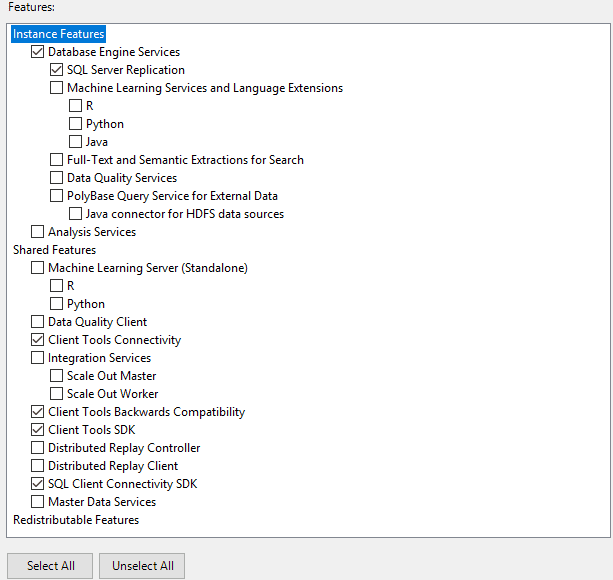
Figure 2-27 Selecting the Instance Features and Shared Features to Install
- Click Next >.
- Leave the option button for Default instance selected.
- Click Next >.
- Click the Startup Type drop-down box for SQL Server Agent Service.
- Click Automatic to start it automatically.
The Startup Type for the SQL Server Database Engine Service is set to Automatic by default.
We will leave the service accounts configuration to Updating the SQL Server and SQL Server Agent Service Accounts, where we will configure the SQL Server and SQL Server Agent Service Account to use the dedicated domain user accounts we had created back in Creating Domain Accounts for the SQL Server Services. - Click the check box for Grant Perform Volume Maintenance Task privilege to SQL Server Database Engine Service to select it.
As noted, this privilege enables instant file initialization by avoid zeroing of data pages. - Click Next > to continue.
- Click Add Current User to add the current user as one of the SQL Server administrators.
- Leave the Windows authentication mode option button selected.
- Click Next >.
- Review the list of features and options you had selected on the Ready to Install step.
- Click Install to start the installation.
The installation runs through the steps to install the features and options you had selected. - Review the status for each of the features installed as shown in Figure 2-28 Reviewing the Installation Status for the Features.
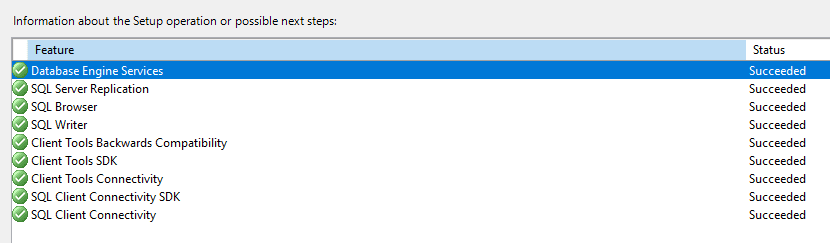
Figure 2-28 Reviewing the Installation Status for the Features
- Click Close.
We have now installed SQL Server 2019 successfully on the VM. We will install SSMS next as it contains the tools to configure, monitor, and administer SQL Server instances and databases. - Browse to the VirtualBox-Share folder on the VM.
You can go to This PC on your VM and then you will find the VirtualBox-Share folder mapped to one of your drives. - Double-click the SSMS-Setup-ENU file.
- Click Run.
- Click Install.
Setup will run and install all the required packages. Then, prompt you to restart the computer to complete the setup. - Click Restart.
The VM will restart and then prompt you to logon. - Logon to the VM.
- Open SSMS.
- Press Enter.
- Click Connect on the Connect to Server dialog box.
SSMS connects you to the default instance and you are back on your familiar territory – the SSMS interface. Next, we will deploy Ola Hallengren’s SQL Server Maintenance Solution. - Go to https://ola.hallengren.com/.
- Click the link sql to download it.
The MaintenanceSolution.sql file will download and save to your default download folder. - Move the sql file to the VirtualBox-Share folder.
You can now access the script from the VM. - Press Win + E on your keyboard for the VM.
- Click This PC on the left pane.
- Double-click Local Disk (C:).
- Create the Data folder in the C:\ drive.
- Create the Log folder in the C:\ drive.
- Create the Backup folder in the C:\ drive.
As shown in Figure 2-29 Creating the Data, Log, and Backup Folders, you will have these three folders created in the C:\ drive.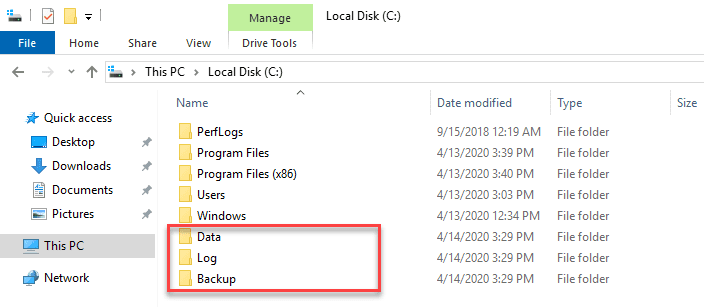
Figure 2-29 Creating the Data, Log, and Backup Folders
As their names suggested, the Data folder is for the SQL Data files, the Log folder is for the SQL Log files, and the Backup folder is for the database backups.
Just like good mechanics have their toolboxes, good SQL DBAs should have their utility scripts stored in their utility databases. In the virtual lab, we will create a user database for each of the SQL Server instances for such purpose – dbaUtilties database.
- Open SSMS.
- Connect to the default instance.
- Run the following sql script to create the dbaUtilities database:
01	-- dbaUtilities database

02	-- Incrase the maxsize for data and log files as needed

03	USE master;

04	GO

05	CREATE DATABASE dbaUtilities

06	ON

07	( NAME = dbaUtilities_data,

08	FILENAME = 'C:\DATA\dbaUtilities_data.mdf',

09	SIZE = 50MB,

10	MAXSIZE = 100MB,

11	FILEGROWTH = 10MB )

12	LOG ON

13	( NAME = dbaUtilities_log,

14	FILENAME = 'C:\Log\dbaUtilities_log.ldf',

15	SIZE = 25MB,

16	MAXSIZE = 50MB,

17	FILEGROWTH = 5MB )18	GO
Script 2-1 dbaUtilities.sql - Open the sql script from the VirtualBox-Share folder.
- Replace the master database with the dbaUtilities database in line 22 as shown in Figure 2-30 Modifying the MaintenanceSolution.sql.
- Replace ‘Y’ with ‘N’ in line 26 to not create jobs.
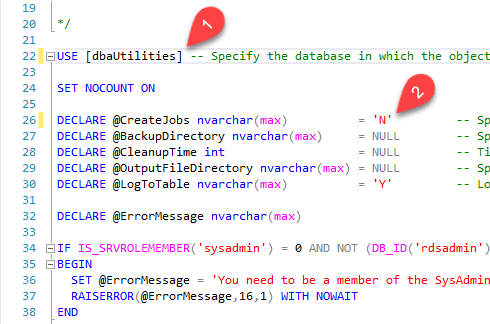
Figure 2-30 Modifying the MaintenanceSolution.sql
- Execute the script.
All the Ola Hallengren’s SQL Server Maintenance Solution objects are then created in the dbaUtilities database. - Run the following Running Full and Tlog Backups.sql script to execute Full and Tlog backups of the dbaUtilities database:
01	-- Run a Full backup of dbaUtilities

02	EXECUTE dbaUtilities.dbo.DatabaseBackup

03	@Databases = 'dbaUtilities',

04	@Directory = 'C:\Backup',

05	@BackupType = 'FULL',

06	@Compress = 'Y'

07	GO

08	-- Wait 5 Seconds

09	WAITFOR DELAY '00:00:05'

10	-- Run a Tlog backup of dbaUtilities

11	EXECUTE dbaUtilities.dbo.DatabaseBackup

12	@Databases = 'dbaUtilities',

13	@Directory = 'C:\Backup',

14	@BackupType = 'LOG',

15	@Compress = 'Y'16	GO
Script 2-2 Running Full and Tlog Backups - Check the backup folder to see the Full and Tlog backups of the dbaUtilities database as shown in Figure 2-31 Checking to See the Full and Tlog Backups:
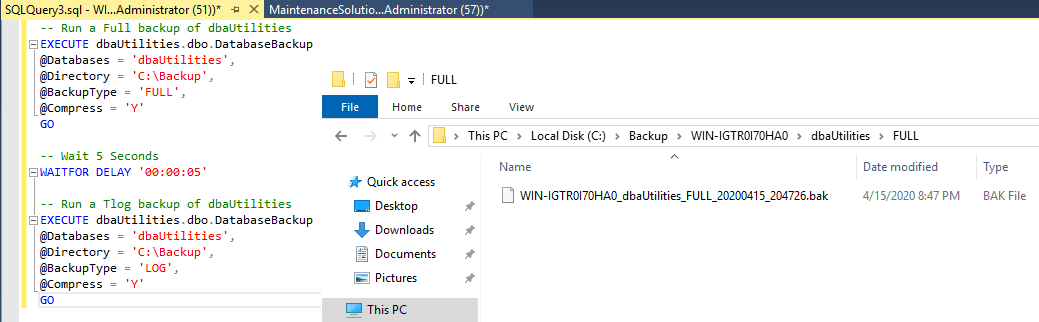
Figure 2-31 Checking to See the Full and Tlog Backups
Notice that the backup file starts with the instance name, then the database name, continue with the type of backup, and finally end with the timestamp of YYYYMM_HHMMSS. Neat!
- Open SQL Server Configuration Manager.
- Expand SQL Server Network Configuration on the left pane of SQL Server Configuration Manager.
- Click Protocols for MSSQLSERVER.
Notice TCP/IP is Disabled. - Right-click TCP/IP.
- Click Enable on the pop-up menu.
- Click OK to acknowledge that the change will take effect after the service is restarted.
This will enable TCP/IP for your SQL Server instance. Next, we will configure the inbound rule for Windows Firewall on the VM to allow inbound connections through port 1433. - Open Control Panel.
- Click System and Security.
- Click Windows Defender Firewall.
- Click Advanced settings on the left pane.
- Click Inbound Rules on the left pane of Windows Defender Firewall with Advanced Security.
- Click New Rule… on the Actions pane.
- Click the option button for Port.
- Click Next >.
- Type 1433 in the text box for the option button Specific local ports.
- Click Next >.
- Leave the default option button for Allow the connection selected.
- Click Next >.
- Leave the default options checked for Domain, Private, and Public.
- Click Next >.
- Type Allow SQL 1433 Inbound in the Name text box.
- Click Finish.
This creates the inbound rule for port 1433.
Note: Named instances of SQL Server use dynamic ports. The dynamic port for SQL Server can change every time the Database Engine is restarted. For named instances, you can create an exception in the firewall for sqlservr.exe. See Configure the Windows Firewall to Allow SQL Server Access for more details. - Shutdown the VM to prepare for cloning in the next steps.
- Open Oracle VM VirtualBox Manager.
- Right-click the VM on the left pane.
- Click Clone… on the pop-up menu.
- Type DV-SQL02 in the Name text box.
- Click the drop-down box for Mac Address Policy.
- Click Generate new MAC address for all network adapters.
- Click Next.
- Leave the option button selected for Full clone.
- Click Clone.
The cloning process will start and shows you the progress for estimated percentage completed. Move to the next step after cloning is completed. - Repeat steps 2 to 9 to clone the VM to create DV-SQL03.
Wait for the cloning process for DV-SQL03 to complete. Next, we will rename the template VM to DV-SQL01. - Right-click on the VM on the left pane.
- Click Settings… on the pop-up menu.
- Type DV-SQL01 in the Name text box to replace the existing name VM.
- Click OK.
You will now have three VMs created as shown in Figure 2-32 Cloning to Create Three VMs.
Figure 2-32 Cloning to Create Three VMs
Downloading the SQL Server Management Studio (SSMS)
Over the past few years, several new tools made headlines. However, SSMS remains as the most popular tool for working with SQL Server databases. In this section, we will download SSMS on the host computer and place the installation file on the shared folder so that you can get the file in the shared folder in the VM.
Note: We will download SSMS on the host computer rather than on the VM. This will enable us to run through the steps on how to use the Shared Folder feature in Oracle VM VirtualBox to share the file between the host computer and the VM.
To download SSMS on the host computer:
Installing SQL Server 2019 and SSMS
As the virtual lab is limited on resources and our objective is to simulate a test environment for HADR, we will limit our installation of SQL Server 2019 to have the core features of the Database Engine Services and Shared Features. We will install the default instance and leave the Service Accounts configuration to Updating the SQL Server and SQL Server Agent Service Accounts, where we will configure dedicated service accounts for each of the VMs. We will choose Windows authentication mode and add current user as the SQL Server administrator. To simplify the test environment for the HADR virtual lab, we will leave the configurations for Data Directories, TempDB, and Filestream to their defaults.
To install SQL Server 2019 on the VM:
To Install SSMS:
Deploying Ola Hallengren’s SQL Server Maintenance Solution
Ola Hallengren’s SQL Server Maintenance Solution is a free set of SQL scripts that you can use for maintaining your databases. It covers maintenance tasks such as backups, integrity check, and index and statistics maintenance. It’s a popular maintenance solution supported by Ola Hallengren and the SQL community. Over the past years, it’s deployed throughout SQL Servers around the global.
In this section, we will download the script on the host computer, copy it to the VirtualBox-Shared folder, create the data, log, and backup folders in the VM in for the databases, create a user database called dbaUtilities, and run Ola Hallengren’s SQL Server Maintenance Solution script to create the objects on the dbaUtilities database.
Downloading the Ola Hallengren’s SQL Server Maintenance Solution on your host computer:
Creating the SQL data, log, and backup folders in the VM:
Creating the dbaUtilities database:
Creating the Ola Hallengren’s SQL Server Maintenance Solution objects in the dbaUtilities database:
Enabling TCP/IP for SQL Server
The TCP/IP protocol is required for remote communications and it’s disabled by default in SQL Server 2019. You need to enable it and restart SQL Server service for it to take effect.
To enable TCP/IP for SQL Server:
Configuring Windows Firewall on the VM
The Windows Firewall prevents unauthorized access to your computer. To access SQL Server through a firewall, you need to open the SQL Server port. In the virtual lab, we are running default instances on all three servers, we will create an inbound rule to open the default port 1433.
To create an inbound rule in the Windows Firewall for port 1433:
Clone the VM to Create Two Extra VMs
Magicians can clone themselves through trickery to create exact duplicates. While we are no magicians ourselves, we can use Oracle VM VirtualBox to clone a VM to create multiple exact duplicates. That’s what we will do in this section. Rather than repeating the steps from Creating a VM in Oracle VM VirtualBox through Configuring Windows Firewall on the VM to create two extra VMs, we will clone the VM we had created to create two new VMs.
To clone the VM to create two new VMs:
We now have three VMs for SQL Server created for the virtual lab.
Next week’s post will cover configuring VMs for the SQL Servers.
If you’ve missed anything in the series, I’ve included the links below:
Virtual Network for the Virtual Lab
Software & Hardware Requirements
Installing Oracle VM VirtualBox and Creating a Virtual Network