SQL Server Database Engine Installation Tips
Author: Sen Subramaniam | 8 min read | May 13, 2020
Installing a new instance of SQL Server is a common task for DBAs and most of us take a GUI-based approach that is easy and self-explanatory. However, there are some configuration options, both while installing and immediately afterwards, that DBAs can do to improve the functioning of SQL Server. This blog post aims to highlight those options and their benefits.
Volume Maintenance Privilege
SQL Server’s ability to perform ‘Instant file initialization’ will result in significant time saving when new databases with large initial file sizes are created, or when databases are restored from backups. In short, this permission allows SQL Server to skip the normal process of ‘zeroing out’ disk space, before a new data file is provisioned, thus making it quicker. This is especially helpful when VLDBs need restored either normally or during a disaster recovery (DR) process
The option is now available to be configured during installation and one must simply check the box against it as shown below:

TempDB Configuration
TempDB is a critical system database in SQL Server. Its usage goes beyond hosting user defined temp tables. TempDB is used internally by SQL Server for such purposes as hosting hash tables (intermediate tables in joins), tables variables, table valued functions, for index creation, sorts etc., While this is all mostly transparent for user processes, a poorly configured or sized TempDB can result in sub optimal functioning of the database engine and can potentially cause problems.
During installation there’s an option available to configure the number of files in TempDB, their initial size and their growth factor. To start with, Microsoft recommends that the number of TempDB files be equal to the number of logical processors or eight (8), whichever is lower.
The files can also be sized appropriately during installation itself to get an optimal start to TempDB usage, as the image below shows.
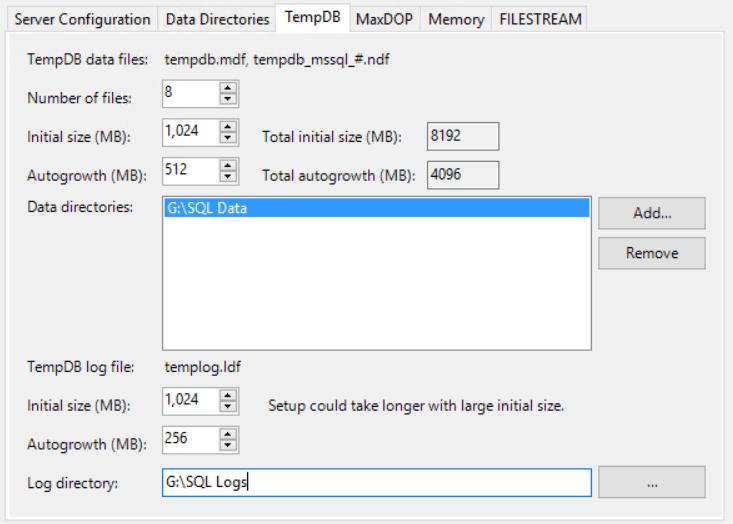
Here, the number of files is configured to be 8, equal to the number of logical processors and with an initial file size of 1 GB with a growth factor of 512 MB. If the disk configuration allows for it, the initial size can be much larger too, thus reducing the need for file growth.
Data Directories
Another simple but elegant configuration is to designate folders for data and log files, named appropriately. This avoids the multiple layers that SQL Server designated these folders, by default, thus making it simpler and easier to group data and log files.
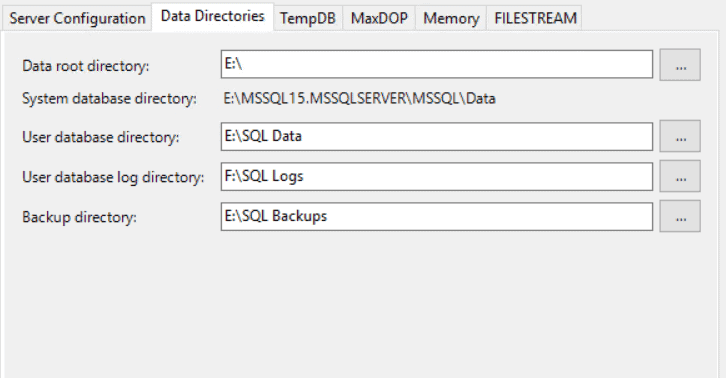
In the image above, the E, F drives were designated for data and logs respectively. The ‘SQL Data’ and ‘SQL Logs’ folders were created ahead of time.
Memory Setting
The recommended practice is to allocate all but 80% of server memory to SQL Server. This can, however change significantly, depending on the total available memory. But, for this example, we assume 80% as the initial allocation.
A simple trick to calculate this is 0.8*(total server memory in GB)*1024 = Number that is put in Max Memory.
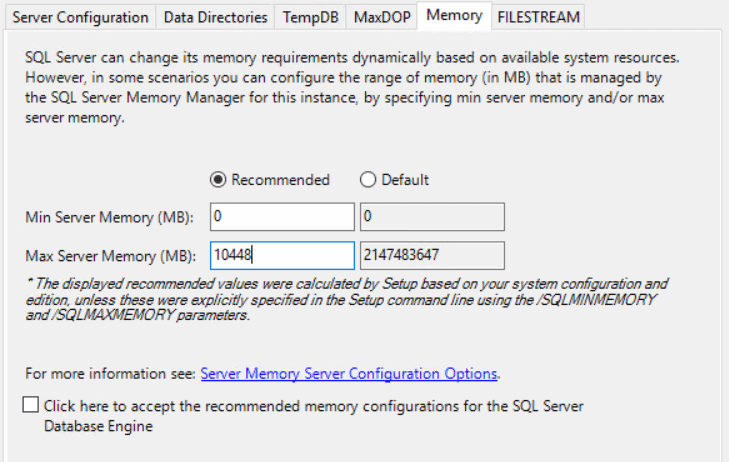
The 80% standard recommendation is to allow for less memory contention and paging by allocating at least 20% of the available memory to OS, which is mostly sufficient for normal operations.
Model Database Configuration
Model database servers as a reference for new databases are created in an instance of SQL Server. The configuration of model database and its settings are copied to the new databases. While there are several database settings that can be configured on Model, and thus propagating them to the new databases, these mostly depend on individual requirements of the environment.
Two settings, however, can apply to most environments, and they are the initial file size and growth factor ones. The initial file size ensures that the database and log files created for new databases, are sufficiently large. The growth factor allows for growth events to be less frequent, something that can greatly help OLTP performance.

After installation, by accessing the properties of the Model database, the file settings can be changed. In the example above, an initial file size of 10 GB with a growth factor of 1 GB for the data file, and an initial file size of 1 GB with a growth factor of 256 MB has been configured for the Model database.
Server Settings
There are many server settings that control SQL Server’s functioning. Things from number of parallel processors to use, to controlling access through xp_cmdshell are features that can be set using the sp_configure command using T-SQL.
MAXDOP, Max Server Memory, Min Server Memory are some features that DBAs configure this way. Two of the other most common settings that generally applies to most servers are ‘Backup Compression’ and ‘Optimize for ad hoc workloads.’
Backup compression is a very useful feature that saves disk space by compressing backup files. This can be controlled via maintenance plans and individual backup T-SQL commands, but is optimal to enable them at the server level so no large files are created on the disk, in such situations as running ad hoc backups.
The optimize for ad hoc workloads setting allows SQL Server to reduce memory usage by query plans that are not reused. Only plans of queries that are rerun, get full space in memory.
Using the T-SQL below, these can be enabled:
EXEC sp_configure 'show advanced options', 1

RECONFIGURE

GO
EXEC sp_configure 'optimize for ad hoc workloads', 1
RECONFIGURE
GO
EXEC sp_configure 'backup compression default', 1
RECONFIGURE
GO
Deadlock Trace Flags
Deadlocks are resolved internally by SQL Server based on the cost associated with the queries involved in deadlocks. In many cases, applications and user processes are built to handle deadlocks well, without affecting data quality, yet, there may be times when deadlocks might repeat and warrant a more detailed analysis. Deadlock trace flags, when enabled, ensure that the details of the deadlock are captured in the error log for later analysis.
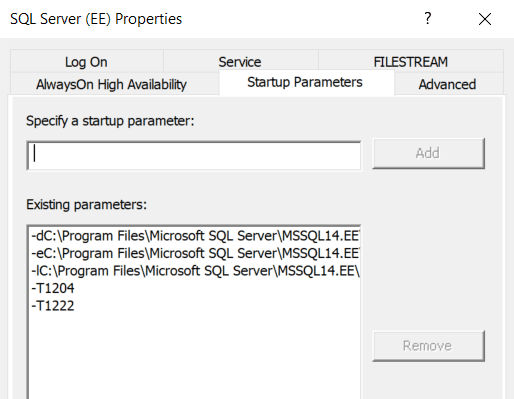
Trace flags 1204 and 1222 capture the deadlock node and query details. These trace flags can be enabled using the T-SQL command DBCC TRACEON, but a better way to have them enabled, and more importantly, remain enabled after a server restart is to add them to the startup parameters of SQL Server.
This can be done by accessing the startup parameters section and specifying the trace flags as shown below, from SQL Server configuration manager:
Additional Configuration Tasks
Once the SQL Server instance has been installed and configured as per best practices and/or company standards, it is advisable that proper maintenance and backup jobs are set up at the same time, so databases that are added eventually are covered. Some of the standard maintenance and backup plans are:
- A full backup job running on a schedule with folders designated for each database
- A differential backup job, if needed with similar specifications as above
- A T-Log backup job to cover databases in full recovery model. Exceptions should be made for databases that will be involved in Log Shipping
- Index and statistics maintenance job that run at least once a week to remove fragmentation from indexes and compute statistics with a suitable scan percentage value, to ensure generation of optimal execution plans
- Job to recycle the error log regularly to help load it up quickly, in times of immediate trouble shooting needs
- Maintenance clean up task to remove maintenance history periodically
- Configure the SQL Server agent to store enough data for historical job analysis
As mentioned at the beginning of this blog, these are some of the configuration and set up items that align with general best practices of SQL Server setup. Often there are other items that need to be configured to comply with company standards or specific application or user requirements. Examples of such would be Database Mail, TLS encryption of database connections, SNAPSHOT ISOLATION, MAXDOP, etc.
It’s good practice to build a standard build document that incorporate all the above steps, so all installations of SQL Server instances across the company are uniform and meet all requirements.
Datavail DBAs install and configure SQL Server instances as per the industry best practices, which are refreshed as newer versions come out, and based on our very own experiences and testing processes. At the same time, we also adapt to established standards, if our customers have them, while enhancing those with better methods, wherever needed, so the SQL Server is installed and configured in a manner for optimal usage.
A standard Datavail installation includes all the above steps, along with monitoring the server 24x7x365 using our proprietary database monitoring tool, Datavail Delta, that comes included with our services. Additionally, as part of our standard operating procedure, SQL Server patches are applied regularly, audits such as backup, security, hardware resource utilization etc., are done at periodic intervals, and queries are optimized, in an effort to keep the server as optimized as it can be, both on-premises and in the cloud. If you’re looking for SQL Server support for your organization, contact us to learn more. Find all of our SQL Server resources here.