SQL on Linux: Connecting to and Querying SQL on Linux
Author: JP Chen | 8 min read | September 10, 2019
You can remote connect and query the SQL Server instances installed on Windows Servers from your Windows PC. Are you also wondering if you can do the same for the SQL Server instances installed on Linux? I have great news for you. Yes! You can. In this section, we will cover connecting and querying via SQL Server Management Studio (SSMS) and Azure Data Studio.
Changing the VirtualBox Network Adapter Before Continuing
In a previous section, we had configured port forwarding for the Linux virtual machine in Oracle VM VirtualBox Manager to connect to the Internet to download the required software and updates. Before we continue the following sections, we will need to change our Network Adapter for the Linux virtual machine to attach to “Host-only Adapter” for us to connect to the SQL Server instance installed on the Linux Server from our Windows PC host computer.
To change the Network Adapter for the Linux virtual machine to “Host-only Adapter,” perform the following steps:
1. Right-click on “Ubuntu” on the left-pane of Oracle VM VirtualBox Manager.
2. Click “Settings…” on the pop-up menu.
3. Click “Network” on the left-pane of the “Settings” page.
4. Click the “Attached to:” drop-down box.
5. Select “Host-only Adapter”.
6. Click the “OK” button to complete the change.
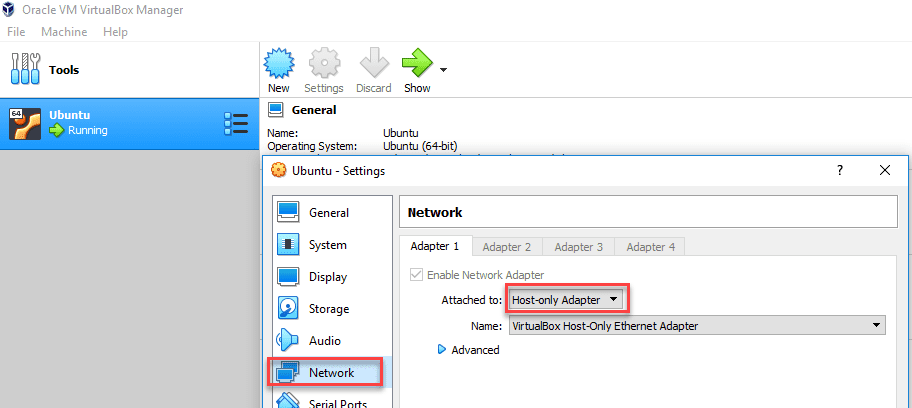
Figure 3-1: Change the Network Adapter to Host-only Adapter
After this change, you will lose connection to the Internet. If you need to connect to the Internet, you will need to change the Network Adapter to attach to “NAT” and configure port-forwarding as described back in the “Installing and Configuring PuTTY Remote Terminal” section.
7. Type “ifconfig” on the command line of your Ubuntu virtual machine.
8. Make a note of the ip address. In my case, it is 192.168.56.101.
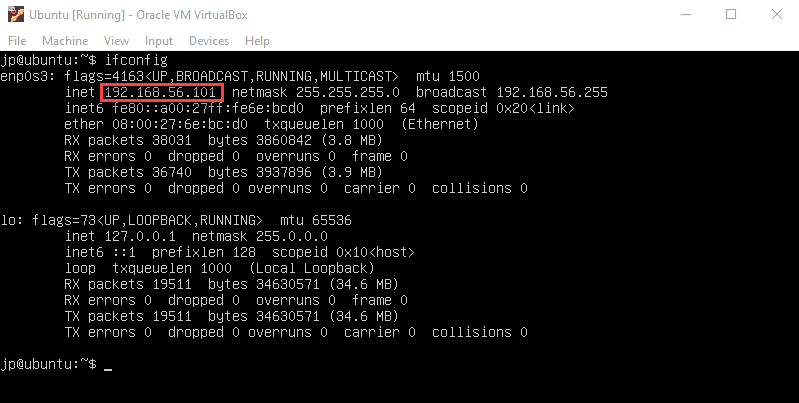
Figure 3-2: ip address of the Ubuntu Server
9. Open PuTTY if it closed.
10. Enter the ip address in the “Host Name (or IP address)” textbox of the PuTTY Configure page.
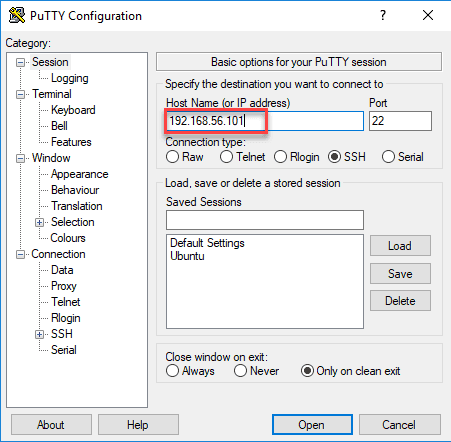
Figure 3-3: Enter the ip address in PuTTY
11. Click the “Open” button to connect.
12. Click “Yes” to add the key to PuTTY’s cache and carry on connecting.
13. Enter your login and password.
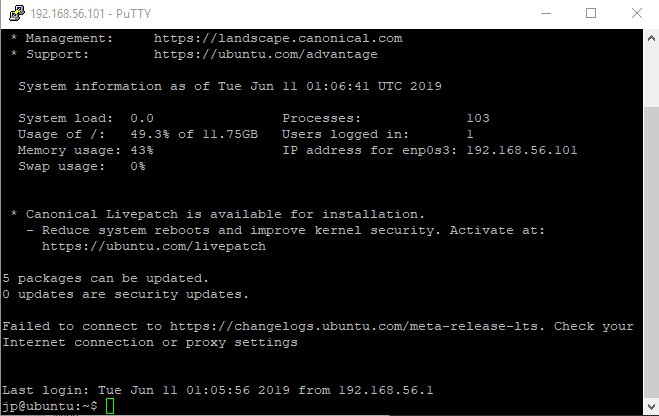
Figure 3-4: Remote connect via PuTTY
Connecting from SQL Server Management Studio (SSMS)
To connect and query SQL on Linux via SQL Server Management Studio (SSMS), perform the following steps:
1. Download and install SQL Server Management Studio (SSMS) on your Windows PC if not already done.
As of this writing, September 10, 2019, you can find the latest version, SQL Server Management Studio 18.0 (GA), from this page: https://docs.microsoft.com/en-us/sql/ssms/download-sql-server-management-studio-ssms?view=sql-server-2017.
It is a 523 MB file. The download duration will vary depending on your download speed.
You can install it and accept all the default options. The installation can take up to 10 minutes and requires a restart of your PC to complete.
2. Get the ip address from your Ubuntu Server by running “ifconfig” on your PuTTY terminal.
3. Type “hostname” on the command line to find the name of the Ubuntu Server.

Figure 3-5: IP address and hostname of your Ubuntu Server
In my case, the ip address of the Ubuntu Server is 192.168.56.101 and the hostname of the server is ubuntu.
4. Open SQL Server Management Studio (SSMS) on your Windows PC (the host computer).
5. Type the ip address in the “Server name:” text.
6. Select “SQL Server Authentication” from the “Authentication:” drop-down box.
7. Type “sa” in the “Login:” drop-down box.
8. Type your password for your SQL Server instance installed on the Ubuntu Server. In my case, it is “Password#123.”
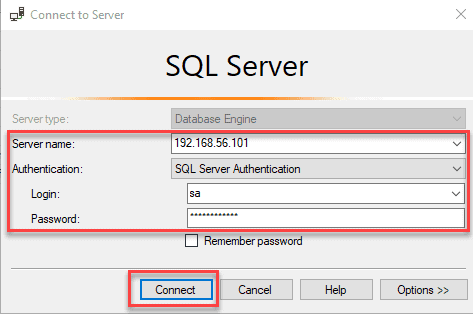
Figure 3-6: Connect to your SQL on Linux using SSMS
9. Click the “Connect” button.
You will then be connected to your SQL Server instance installed on the Ubuntu Server. You can now query and run commands just like you are on a SQL Server installed on Windows Servers.
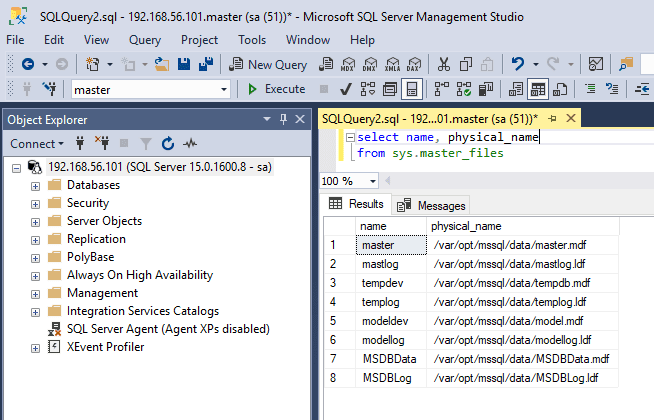
Figure 3-7: Run queries just as like you are on a SQL Server installed on Windows Servers
10. Click on the “Connect” button on the “Object Explorer” of SSMS.
11. Type the “ubuntu” in the “Server name:” text.
12. Select “SQL Server Authentication” from the “Authentication:” drop-down box.
13. Type “sa” in the “Login:” drop-down box.
14. Type your password for your SQL Server instance installed on the Ubuntu Server. In my case, it is “Password#123”.
15. Click the “Connect” button.
You will get an error telling you “Cannot connect to ubuntu.”
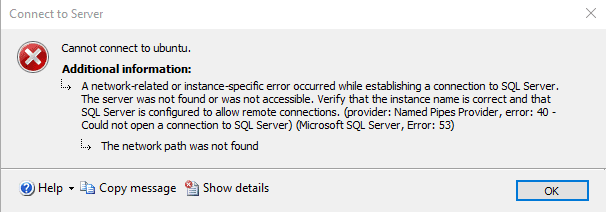
Figure 3-8: Cannot connect using hostname
To fix this error, we will need to update the hosts file in the Windows PC.
16. Search for “notepad” in your Windows PC.
17. Right-click on “notepad.”
18. Select the option “Run as Administrator.”
19. Open the hosts file in your Windows PC. My Windows PC is running Windows 10 Professional, the location for the hosts file is C:\Windows\System32\drivers\etc\hosts.
20. Add the ip address and hostname of your Ubuntu Server to the last line of the hosts file.
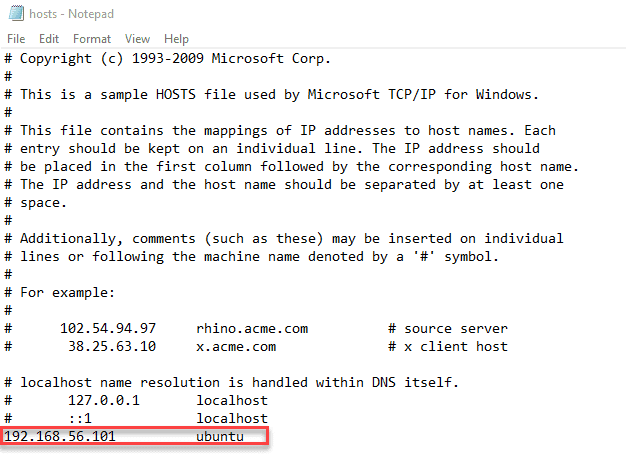
Figure 3-9: Add the ip and hostname to your hosts file
21. Save the changes to the hosts file.
22. Try connecting again using the hostname.
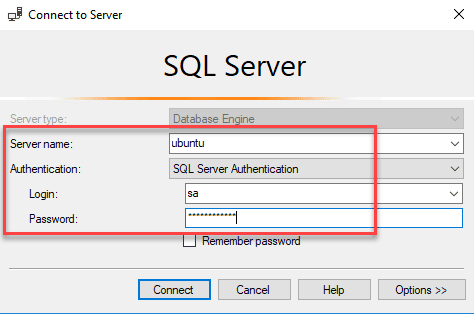
Figure 3-10: Connecting using the hostname
23. Click the “Connect” button.
You will be connected to your SQL Server instances installed on Ubuntu Server successfully!
24. Open a “New Query” windows in SSMS for the server you had just connected.
25. Type “select @@VERSION.”
26. Press the F5 key on your keyboard to execute the query.
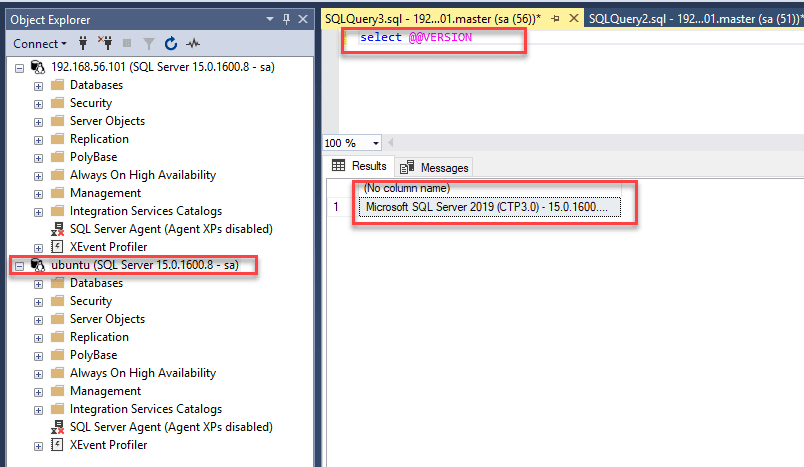
Figure 3-11: Querying the version details against the new named session
Connecting from Azure Data Studio
Azure Data Studio is a cross-platform database tool for data professionals to work with SQL Server and other database platforms. To simulate a production environment in our SQL on Linux lab, we will install it on our Windows PC and remote connect to our SQL Server instance installed on Ubuntu Server.
To connect and query SQL on Linux via Azure Data Studio, perform the following steps:
1. Download and install Azure Data Studio on your Windows PC.
As of this writing, September 10, 2019, you can find the latest version of Azure Data Studio from this page: https://docs.microsoft.com/en-us/sql/azure-data-studio/download?view=sql-server-2017
It is an 82.3 MB file. The download duration will vary depending on your download speed. You can install it and accept all the default options. The installation on my Windows PC took approximately 2 minutes.
2. Get the ip address from your Ubuntu Server by running “ifconfig” on your PuTTY terminal.
3. Type “hostname” on the command line to find the name of the Ubuntu Server.
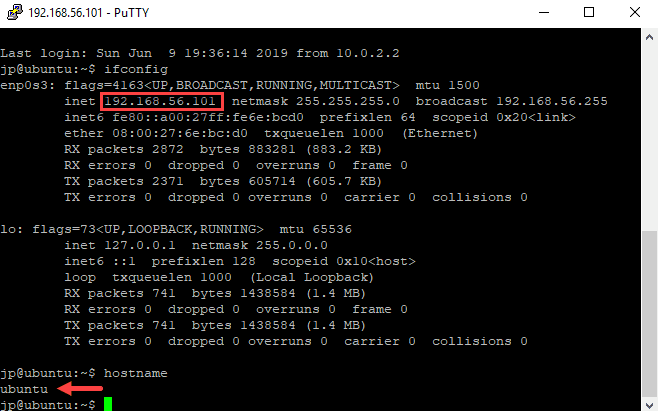
Figure 3-12: IP address and hostname of your Ubuntu Server
In my case, the ip address of the Ubuntu Server is 192.168.56.101 and the hostname of the server is ubuntu.
4. Open Azure Data Studio.
5. Key in your server ip. In this case, I had keyed 192.168.56.101.
6. Select “SQL Login” in the “Authentication type” drop-down box.
7. Type in “sa” in the “User name” textbox.
8. Type in your password for the sa account.
9. Click the “Connect” button to connect to your SQL Server instance installed on the Ubuntu Server.
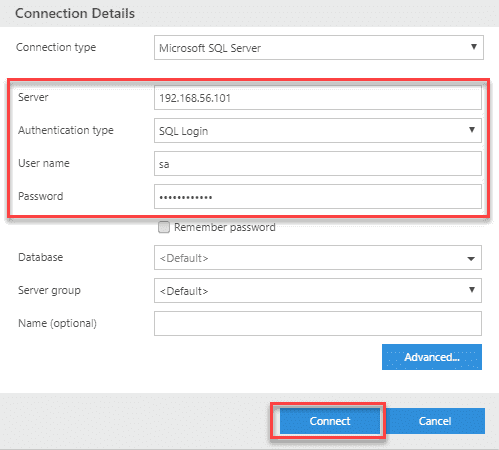
Figure 3-13: Connecting to your SQL Server instance in Azure Data Studio
10. Click the “New Query” box to open a new query window.
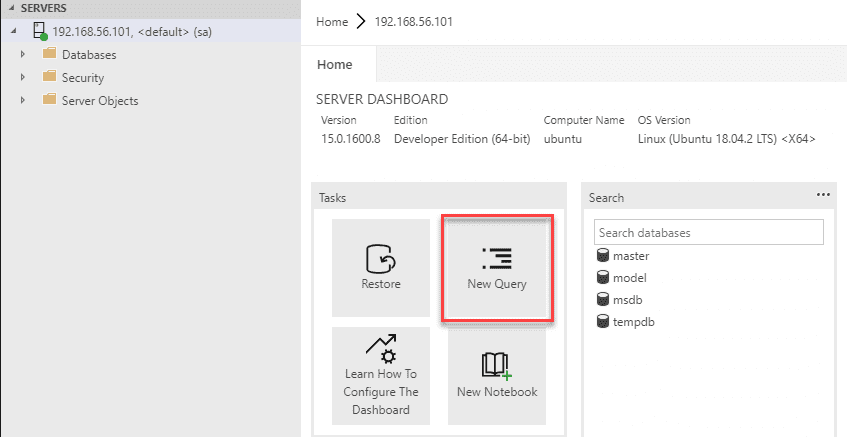
Figure 3-14: New Query
11. Type “select * from sys.databases” in the new query window.
As you type, you will notice the intellisense for code-completion aid like what you see in SSMS.
12. Press F5 on your keyboard to execute the query.
13. Try connecting using the server name and it will also connect successfully just like we did in SSMS.
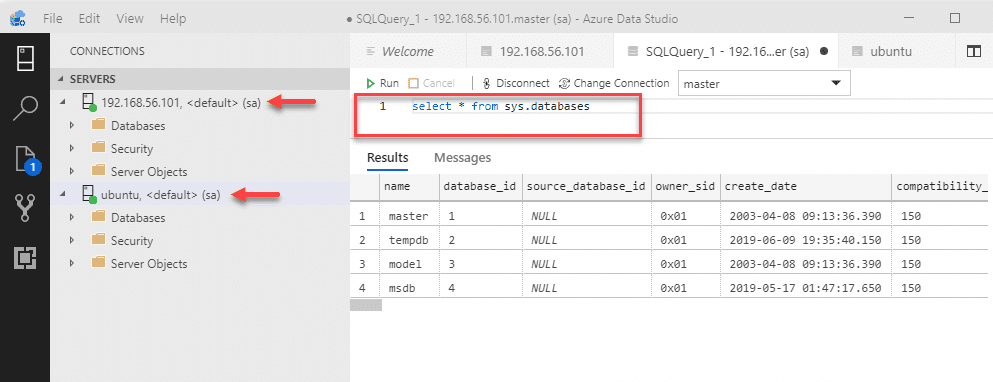
Figure 3-15: Connecting via ip and server name and running a query
Congratulations! If your screen matches Figure 3-11, you had installed Azure Data Studio and queried the SQL Server instance installed on the Ubuntu Server successfully.
You now have an alternative tool in addition to SSMS when connecting to and querying your SQL Server instances.
Read This Next
SQL on Linux: Building Your Own SQL on Linux Lab
If you’re a SQL Server data professional interested in running in SQL on Linux and don’t know where to start, this white paper is for you. SQL Server expert, JP Chen details the essential steps to take including downloading and installing of the required software to build your own SQL on Linux lab on Windows PC.