SQL Server In-Memory tables – Where is data stored?
Author: Pinal Dave | | February 20, 2015
SQL Server 2014 introduced the concept of InMemory OLTP which has been a lesser explored topic for many. Previously we saw how these InMemory tables can be created and how one can access the same. Once the table is created, the syntax, TSQL construct and access seems to be almost similar to how a normal table is created. The interesting aspect of using InMemory OLTP is that it can be configured to be purely an in-memory tables or can be configured as in-memory durable tables. The latter being the default behavior.
Isn’t it ironic that InMemory tables are also durable? One of the major questions asked by developers implementing the same revolves around, where are these tables stored? How are entries written into them? How can we know more about their architecture? All these are valid questions and this blog will try to demystify some of these basic questions.
Understanding by code
The first step is to start creating our database with InMemory capability enabled. A Simple TSQL construct for the same would look like:
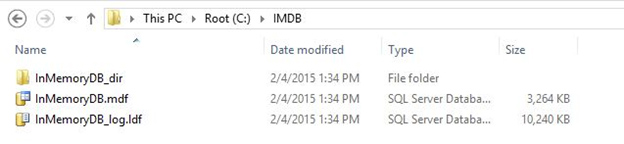
CREATE DATABASE InMemoryDB
ON PRIMARY (NAME = [InMemoryDB_data],FILENAME = 'C:IMDBInMemoryDB.mdf'),
FILEGROUP [InMemoryDB_FG] CONTAINS MEMORY_OPTIMIZED_DATA
	(
	NAME = [InMemoryDB_dir],FILENAME = 'C:IMDBInMemoryDB_dir'
	)
LOG ON (NAME = [InMemoryDB_log],
Filename = 'C:IMDBInMemoryDB_log.ldf',SIZE = 10240KB)
GO
The next logical step is to create an InMemory Optimized table in this database.
USE InMemoryDB
GO
CREATE TABLE InMemoryTable
(
ID INT NOT NULL PRIMARY KEY NONCLUSTERED HASH WITH (BUCKET_COUNT = 100000),
FirstName CHAR(25) NOT NULL,
LastName CHAR(25) NOT NULL
) WITH (MEMORY_OPTIMIZED = ON, DURABILITY = SCHEMA_AND_DATA)
GO
Note how we have specified the Memory Optimized table and Schema_and_data as part of durability. This makes sure the data is persistent and can withstand any server reboots. Let us once again check the metadata for this database.
Use InMemoryDB
GO
SET NOCOUNT ON
GO
SELECT *
FROM sys.master_files
WHERE database_id = DB_ID();
GO
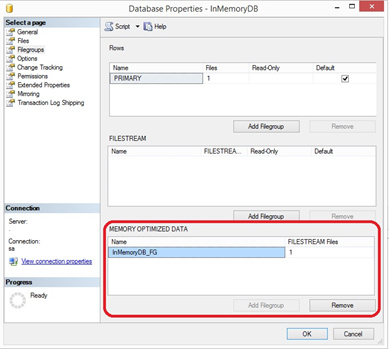
You will see the InMemory table has been implemented as FILESTREAM and can be checked in the UI like below. Select the database properties, Filegroups and the Memory Optimized Data section for details.
Where is my data?
Now that we have created the filegroups, we need to next explore the files that SQL Server creates as part of InMemory tables. These files are called as Checkpoint files. They come in pairs called as DATA and DELTA files. To check all the checkpoint files created, execute the following DMV:
SELECT *
FROM sys.dm_db_xtp_checkpoint_files
GO
I am running on an 8 core machine and have got 18 files – Data files are 128 MB in size each and Delta files are 8MB in size. Check for the active checkpoint files also note how the data and delta files are made as a pair:
SELECT *
FROM sys.dm_db_xtp_checkpoint_files
WHERE state= 1
GO
![]()
In the above diagram you can see the Data file has a Delta file as pair and vice versa. Next step is to insert few rows, Delete a row and Update few rows into this table:
Use InMemoryDB
GO
SET NOCOUNT ON
GO
BEGIN TRAN
DECLARE @i INT
SET @i = 1
WHILE @i <= 1000
  BEGIN
      INSERT INTO InMemoryTable
      VALUES      (@i, 'FirstName-'+CAST(@i as varchar(10)),'LastName-'+CAST(@i as varchar(10)))
      SET @i = @i + 1
  END
COMMIT TRAN
GO

DELETE from InMemoryTable
WHERE ID = 100
GO

UPDATE InMemoryTable
SET FirstName = FirstName
WHERE ID between 100 AND 150
GO
As you can see we have:
INSERTED: 1000 rows + (50 which was updated)
DELETED: 1 row + (50 which was updated)
UPDATED: 50 rows
An update in the system has to be considered as a DELETE followed by an INSERT. Now let us query the DMVs to see what these files contain.
DECLARE @deleted_row_count INT;
DECLARE @inserted_row_count INT;
DECLARE @effective_row_percentage FLOAT

-- get the total deleted row counts by looking at active delta files
SELECT @deleted_row_count = SUM (deleted_row_count)
FROM sys.dm_db_xtp_checkpoint_files
WHERE file_type = 1

-- get total inserted row count by looking at active data files
SELECT @inserted_row_count = SUM (inserted_row_count)
FROM sys.dm_db_xtp_checkpoint_files
WHERE file_type = 0

SELECT @deleted_row_count 'deleted_row_count', @inserted_row_count 'inserted_row_count'
GO
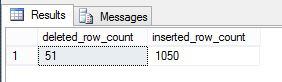
As you can see this perfectly adds-up to the calculations we made just a while back.
Now that we understand how InMemory OLTP checkpoint files work, you can say with confidence where the data is getting stored. SQL Server efficiently manages these files as it rolls over and created new files once they get full. In this blog, we showed where data for InMemory gets stored and how one can query the same to get vital information about InMemory tables.
Routine healthchecks have proven to improve database performance. Check out this white paper, Top SQL Server Issues where we will share the top issues, the consequences of not taking action, and why consistent use of a SQL Server Health Check in conjunction with ongoing database management can lead to improved database environments and maximize the investment of time and resources.
If you are interested in learning more, please visit my other SQL Server blog posts as well as our latest SQL Server blog: In-MemoryOLTP – New Index – Hash Index.

Blog Author
Related Posts

How to Solve the Oracle Error ORA-12154: TNS:could not resolve the connect identifier specified
The “ORA-12154: TNS Oracle error message is very common for database administrators. Learn how to diagnose & resolve this common issue here today.

Data Types: The Importance of Choosing the Correct Data Type
Most DBAs have struggled with the pros and cons of choosing one data type over another. This blog post discusses different situations.

How to Recover a Table from an Oracle 12c RMAN Backup
Our database experts explain how to recover and restore a table from an Oracle 12c RMAN Backup with this step-by-step blog. Read more.