Building a SQL Server Virtual Lab in Windows: Configuring VMs for the SQL Servers
Author: JP Chen | | July 16, 2020
In my previous blog post, Create VMs for the SQL Servers, we had created a VM, installed Windows Server 2019 and SQL Server 2019, enabled TCP/IP, configured Windows Firewall, and then cloned the VM to create two new VMs. We had also renamed the labels for the VMs as DV-SQL01, DV-SQL02, and DV-SQL03 in Oracle VM VirtualBox Manager.
Now, we will configure the VMs to assign static IP addresses to the VMs, rename the VMs and join the DV-SQLNET domain, rename the SQL Server instances in each of the VMs, and update the SQL Server and SQL Server Agent Service Accounts to use the domain user accounts we had created.
Assigning Static IP Address to the VMs
Back in IP Address, Subnet Mask, and Default Gateway, we had pointed out that every device connected to a network needs an IP address to communicate. Static IP addresses are a better choice than dynamic IP addresses for servers that need constant access and enables you to reach the servers without the IP addresses getting changed. We had assigned a static IP address for DV-DC VM back in Assigning Static IP Address for the DC VM, we will now assign static IP addresses to DV-SQL01, DV-SQL02, and DV-SQL03.
Table 2-4 IP Addresses for the Servers in the Virtual Lab documents each server’s IP address, Subnet Mask, Default Gateway, Preferred DNS Server, and Alternate DNS Server. The Subnet Mask is the same for all servers. The Preferred DNS Server for the DV-DC server is 127.0.0.1 pointing back to itself as it’s serving as the DNS Server for the domain. All other servers in the domain will have the Preferred DNS Server pointing to 192.168.0.20 as it’s the DNS Server. The Alternate DNS Server is pointed to Google DNS Server for all.
Table 2-4 IP Addresses for the Servers in the Virtual Lab
| Server | IP Address | Subnet Mask | Default Gateway |
Preferred DNS Server |
Alternate DNS Server |
| DV-DC | 192.168.0.20 | 255.255.255.0 | 192.168.0.1 | 127.0.0.1 | 8.8.8.8 |
| DV-SQL01 | 192.168.0.21 | 255.255.255.0 | 192.168.0.1 | 192.168.0.20 | 8.8.8.8 |
| DV-SQL02 | 192.168.0.22 | 255.255.255.0 | 192.168.0.1 | 192.168.0.20 | 8.8.8.8 |
| DV-SQL03 | 192.168.0.23 | 255.255.255.0 | 192.168.0.1 | 192.168.0.20 | 8.8.8.8 |
To assign static IP Address to the DV-SQL01, DV-SQL02, and DV-SQL03:
- Click DV-SQL01 to select it on Oracle VM VirtualBox Manager.
- Click Start to start it.
- Logon to the DV-SQL01 VM.
- Open Server Manager if not auto started.
- Click Local Server on the left pane of Server Manager.
- Click the link for Ethernet as shown in Figure 2-33 Opening the IP V4 Properties.
- Right-click on Ethernet in the Network Connections folder.
- Click Properties on the pop-up menu.
- Click Internet Protocol Version 4 (TCP/IPv4).
- Click Properties.
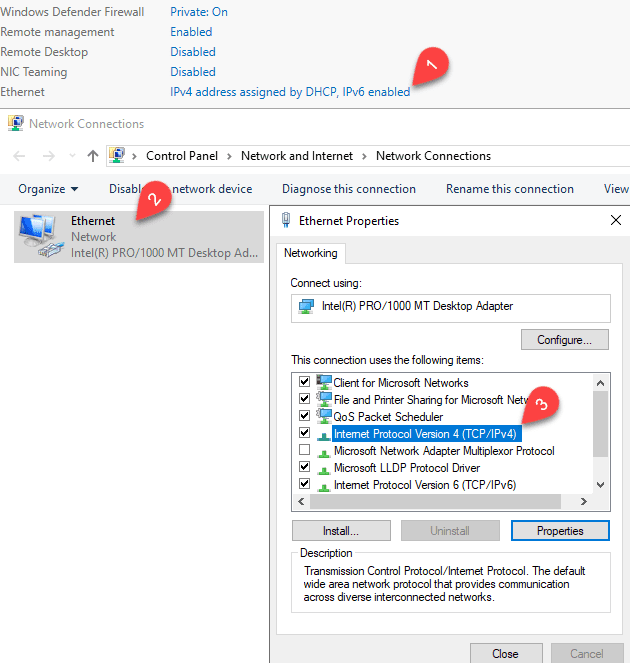
Figure 2-33 Opening the IP V4 Properties
- Click the option button for Use the following IP address as shown in Figure 2-34 Assigning Static IP to the DV-SQL01 VM.
- Type 192.168.0.21 in the IP address field.
- Press Tab on your keyboard.
You will notice the Subnet mask field is auto populated with 255.255.255.0. - Type 192.168.0.1 in the Default gateway field.
- Press Tab on your keyboard twice to move to the Preferred DNS server field.
- Type 192.168.0.20 in the Preferred DNS server field.
This is the IP address of the DC where it also has the DNS sever role installed. - Press Tab on your keyboard.
- Type 8.8.8.8 in the Alternate DNS server field.
We will use the Google DNS Server.
Figure 2-34 Assigning Static IP to the DV-SQL01 VM
- Click OK.
- Click Close.
- Close the Network Connections folder.
- Click the Oracle VM VirtualBox Manager on the host computer taskbar.
- Click DV-SQL02 to select it on Oracle VM VirtualBox Manager.
- Repeat steps 2 to 21 to assign static IP Address to DV-SQL02.
Check Table 2-4 IP Addresses for the Servers in the Virtual Lab for the IP address, Subnet Mask, Default Gateway, Preferred DNS Server, and Alternate DNS Server for DV-SQL02.When completed, the Internet Protocol Version 4 (TCP/IPV4) Properties dialog box should look like Figure 2-35 Assigning Static IP to the DV-SQL02 VM.
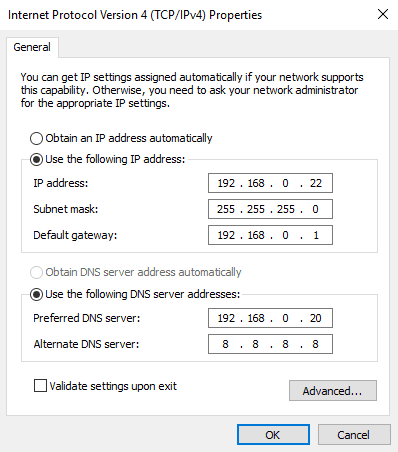
Figure 2-35 Assigning Static IP to the DV-SQL02 VM
- Click the Oracle VM VirtualBox Manager on the host computer taskbar.
- Click DV-SQL03 to select it on Oracle VM VirtualBox Manager.
- Repeat steps 2 to 21 to assign static IP Address to DV-SQL03.
- Check Table 2-5 IP Addresses for the Servers in the Virtual Lab for the IP address, Subnet Mask, Default Gateway, Preferred DNS Server, and Alternate DNS Server for DV-SQL03.
When completed, the Internet Protocol Version 4 (TCP/IPV4) Properties dialog box should match Figure 2-36 Assigning Static IP to the DV-SQL03 VM.
Figure 2-36 Assigning Static IP to the DV-SQL03 VM
We have now assigned static IP addresses to the servers in the virtual lab. Next, we will rename them to DV-SQL01, DV-SQL02, and DV-SQL03 accordingly and then join the DV-SQLNET domain.
Renaming the VMs and Joining the DV-SQLNET Domain
The cloned VMs will inherit the computer name from the original VM. You will need to rename them to reflect their functions and differentiate them from other servers in the network. In this section, we will rename the VMs to DV-SQL01, DV-SQL02, and DV-SQL03 and join them to the DV-SQLNET domain.
You will need the domain administrator access to join the domain. For the following steps, we will use the DV-SQLNET\Administrator account.
To rename the VMs and join the DV-SQLNET domain:
- Click the DV-SQL01 VM on the task bar as shown in Figure 2-37 Clicking on the VM on the Taskbar.
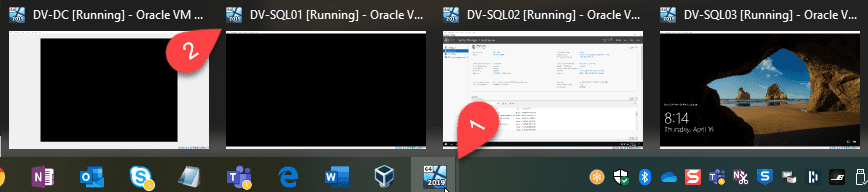
Figure 2-37 Clicking on the VM on the Taskbar
- Open Server Manager.
- Click Local Server on the left pane.
- Click the link for Computer name as shown in Figure 2-38 Changing the Computer Name and Joining Domain.
- Click Change.
- Type DV-SQL01 in the Computer name text box.
- Click the option button for Domain.
- Type DV-SQLNET.COM in the Domain text box.
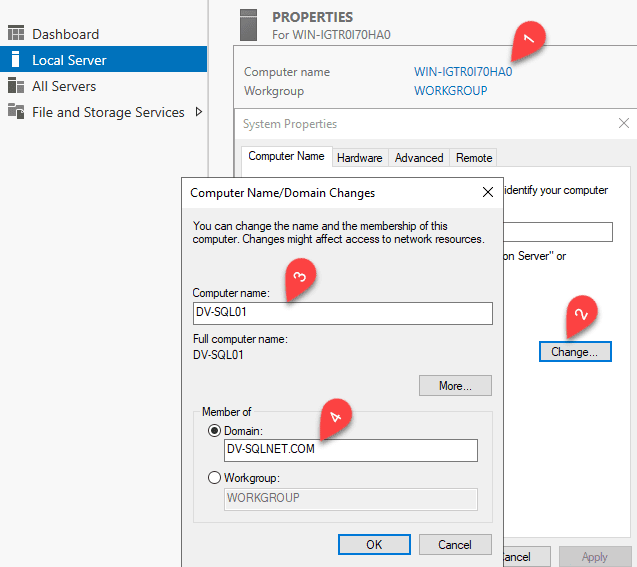
Figure 2-38 Changing the Computer Name and Joining Domain
- Click OK.
- Type DV-SQLNET\Administrator in the User name text box.
- Press Tab on your keyboard.
- Type Password$ in the Password text box.
- Click OK.
- Click OK on the Welcome to the DV-SQLNET.COM domain message box.
- Click OK to acknowledge you must restart your computer to apply these changes.
- Click Close.
- Click Restart Now to restart your computer.
The VM will restart and prompt you to unlock to logon. - Presse Ctrl + Delete on your keyboard.
- Click Other user on the lower left hand corner.
- Type DV-SQLNET\Administrator in the User name text box.
- Press Tab on your keyboard.
- Type Password$ in the Password text box.
- Press Enter on your keyboard.
You are then logged on to the DV-SQLNET domain with the Domain Administrator account. - Open Server Manger if it’s not auto started.
- Click Local Server on the left pane.
- Notice the Computer name and Domain fields are updated as shown in Figure 2-39 Viewing the Computer name and Domain.
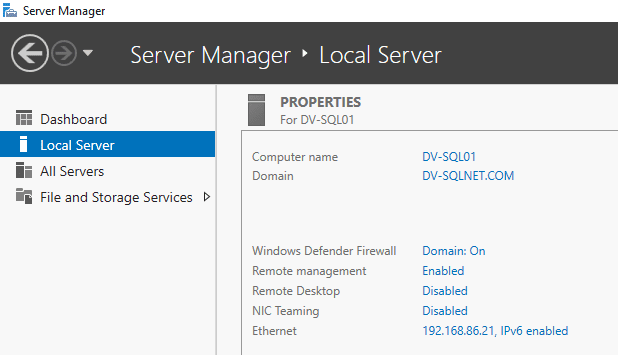
Figure 2-39 Viewing the Computer name and Domain
This completes the renaming step for DV-SQL01 and joining the DV-SQLNET domain. We will continue onto renaming DV-SQL02 and joining the domain in the next steps. - Click the DV-SQL02 VM on the task bar.
- Repeat steps 2 to 25 to rename the VM to DV-SQL02 and join the DV-SQLNET.COM When completed, check the Local Server Properties page and it should show the Computer name as DV-SQL02 and Domain as DV-SQLNET.COM.
- Click the DV-SQL03 VM on the task bar.
- Repeat steps 2 to 25 to rename the VM to DV-SQL03 and join the DV-SQLNET.COM When completed, check the Local Server Properties page and it should show the Computer name as DV-SQL03 and Domain as DV-SQLNET.COM.
Renaming the SQL Server Instances
Like the server names of which were inherited from the original VM, the SQL Server instance too are copied over to the clones. In this section, we will run a script to update them to reflect their actual server names and create a domain login for the SQL DBA, Jack Bauer, and add him to the sysadmin server role.
Updating the SQL Server instance name requires two steps. First, you will need to drop the server using the SP_DROPSERVER stored procedure and then use the SP_ADDSERVER stored procedure to add the correct server.
Creating a domain login for the SQL DBA and adding the login to the sysadmin server role can be done via the CREATE LOGIN and ALTER SERVER ROLE T-SQL statements.
To rename the SQL Server instance name for DV-SQL01, DV-SQL02, and DV-SQL03 and create a domain SQL Login as a sysadmin:
- Click the DV-SQL01 VM on the task bar.
- Logoff the Domain Administrator user.
- Logon to DV-SQL01 using the local administrator.
You can click Other user on the lower left-hand corner and then type in Administrator in the User name text box and Password$ in the password text box as shown in Figure 2-40 Logging on Using the Local Administrator. Notice that we are signing in to DV-SQL01, the local server, not the domain.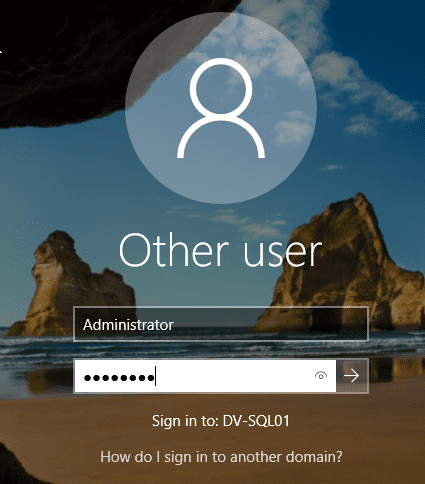
Figure 2-40 Logging on Using the Local Administrator
- Open SSMS.
- Type localhost on the Server name text box.
- Press Enter on your keyboard.
- Open a New Query.
- Open the following Renaming Instance and Creating a Domain SQL Login as a Sysadmin.sql script:
01	Renaming the instance name

02	Creating a domain login and adding it to the system administrator server role

03	DECLARE @OldInstanceName AS NVARCHAR(50),

04	@NewInstanceName AS NVARCHAR(50)

05

06	SELECT @OldInstanceName = @@SERVERNAME,

07	@NewInstanceName = 'SERVERNAME' -- Replace with the corresponding instance name

08

09	Renaming the instance name by dropping the old and then adding the new server name

10	EXEC SP_DROPSERVER @OldInstanceName

11	EXEC SP_ADDSERVER @NewInstanceName, local

12

13	Creating a domain login and adding it to the sysadmin role

14	CREATE LOGIN [DV-SQLNET\JBauer] FROM WINDOWS

15	ALTER SERVER ROLE sysadmin ADD MEMBER [DV-SQLNET\JBauer]
Script 2-3 Renaming Instance and Creating a Domain SQL Login as a Sysadmin.sql - Update ‘SERVERNAME’ on line 07 of the script to ‘DV-SQL01’ as this is to run on DV-SQL01.
- Run the script.
- This will rename the instance to DV-SQL01, create a domain login JBauer, and add the login to the sysadmin server role.
Next, we will do the same for DV-SQL02. - Click the DV-SQL02 VM on the task bar.
- Logoff the Domain Administrator user.
- Logon to DV-SQL02 using the local administrator.
You can click Other user on the lower left-hand corner and then type in Administrator in the User name text box and Password$ in the password text box. - Repeat steps 3 to 7 on the DV-SQL02 VM.
- Update ‘SERVERNAME’ on line 07 of the script to ‘DV-SQL02’ as this is to run on DV-SQL02.
- Run the script.
This will rename the instance to DV-SQL02, create a domain login JBauer, and add the login to the sysadmin server role.Next, we will do the same for DV-SQL03.
- Click the DV-SQL03 VM on the task bar.
- Logoff the Domain Administrator user.
- Logon to DV-SQL03 using the local administrator.
You can click Other user on the lower left-hand corner and then type in Administrator in the User name text box and Password$ in the password text box. - Repeat steps 3 to 7 on the DV-SQL03 VM.
- Update ‘SERVERNAME’ on line 07 of the script to ‘DV-SQL03’ as this is to run on DV-SQL03.
- Run the script.
This will rename the instance to DV-SQL03, create a domain login JBauer, and add the login to the sysadmin server role. We will update the SQL Server and the SQL Server Agent service accounts to use the dedicated domain user accounts in the next steps.
Updating the SQL Server and SQL Server Agent Services Accounts
As our SQL Server instances interact with other servers on the network for HADR, we had created domain user accounts back in Creating Domain Accounts for the SQL Server Services. Each SQL Server instance has a dedicated domain account for the SQL Server service and another for the SQL Server Agent service.
We will now update them in each of the SQL Servers.
To update the SQL Server and SQL Server Agent Services accounts on DV-SQL01, DV-SQL02, and DV-SQL03:
- Click the DV-SQL01 VM on the task bar.
- Unlock the DV-SQL01 VM.
You are still logged on as the local administrator. - Open SQL Server Configuration Manager.
- Click SQL Server Services on the left pane.
- Double-click SQL Server Agent (MSSQLSERVER).
- Click Browse.
- Click Locations…
- Type DV-SQLNET\Administrator in the User name text box.
- Press Tab on your keyboard.
- Type Password$ in the Password text box.
- Click OK.
- Click Entire Directory.
- Click OK.
- Type DV-SQLNET\svc_dv-sql01_sqlagent on the Enter the object name to select text area.
- Click Check Names.
SQL Server authenticates and verifies with the Active Directory and underlines the DV-SQLNET\svc_dv-sql01_sqlagent account. - Click OK.
- Type Password$ in the Password text box.
- Press Tab on your keyboard.
- Type Password$ in the Confirm password text box.
- Click Apply.
- Click Start.
The SQL Server Agent service starts. - Click OK.
- Double-click SQL Server (MSSQLSERVER).
- Click Browse.
- Click Locations…
- Type DV-SQLNET\Administrator in the User name text box.
- Press Tab on your keyboard.
- Type Password$ in the Password text box.
- Click OK.
- Click Entire Directory.
- Click OK.
- Type DV-SQLNET\svc_dv-sql01_sqlde on the Enter the object name to select text area.
- Click Check Names.
SQL Server authenticates and verifies with the Active Directory and underlines the DV-SQLNET\svc_dv-sql01_sqlde account. - Click OK.
- Type Password$ in the Password text box.
- Press Tab on your keyboard.
- Type Password$ in the Confirm password text box.
- Click Apply.
- Click Yes to acknowledge this will cause the service to be restarted.
The SQL Server service restarts. - Click OK.
This completes updating the SQL Server and SQL Server Agent service accounts to use dedicated domain user service accounts. Next, we will do the same for DV-SQL02. - Click the DV-SQL02 VM on the task bar.
- Unlock the DV-SQL02 VM.
You are still logged on as the local administrator. - Repeat steps 3 to 46 for DV-SQL02.
For the SQL Server Agent service account, use DV-SQLNET\svc_dv-sql02_sqlagent.
For the SQL Server service account, use DV-SQLNET\svc_dv-sql02_sqlde.
Next, we will do the same for DV-SQL03. - Click the DV-SQL03 VM on the task bar.
- Unlock the DV-SQL03 VM.
You are still logged on as the local administrator. - Repeat steps 3 to 46 for DV-SQL03.
For the SQL Server Agent service account, use DV-SQLNET\svc_dv-sql03_sqlagent.
For the SQL Server service account, use DV-SQLNET\svc_dv-sql03_sqlde.
You have now configured the VMs for the virtual lab. My final blog post next week in the series will be testing the virtual lab. Stay tuned.
If you’ve missed anything in the series, I’ve included the links below:
Virtual Network for the Virtual Lab
Software & Hardware Requirements
Installing Oracle VM VirtualBox and Creating a Virtual Network

Blog Author
Related Posts

How to Solve the Oracle Error ORA-12154: TNS:could not resolve the connect identifier specified
The “ORA-12154: TNS Oracle error message is very common for database administrators. Learn how to diagnose & resolve this common issue here today.

Data Types: The Importance of Choosing the Correct Data Type
Most DBAs have struggled with the pros and cons of choosing one data type over another. This blog post discusses different situations.

How to Recover a Table from an Oracle 12c RMAN Backup
Our database experts explain how to recover and restore a table from an Oracle 12c RMAN Backup with this step-by-step blog. Read more.